Who knew “portable” satellite dishes were a thing? Sure there are some 90’s and 2000s versions like the Dish Tailgater models I’ve been experimenting with, but did you know there were fold-up C-band dishes from the 80s?
I’ve also opened up a few of Tailgater’s competition, the Winegard brand dish. These seem to have a little different construction, using stepper motors instead of brushed motors.
I’ll no doubt have some future projects with some of these, so stay tuned!
I’ve dabbled in radiotelescopes before, mostly as a way to use old TV satellite dishes. However, this time I took a satellite dish and turned it into a microwave “camera”, able to create images in the Ku band!
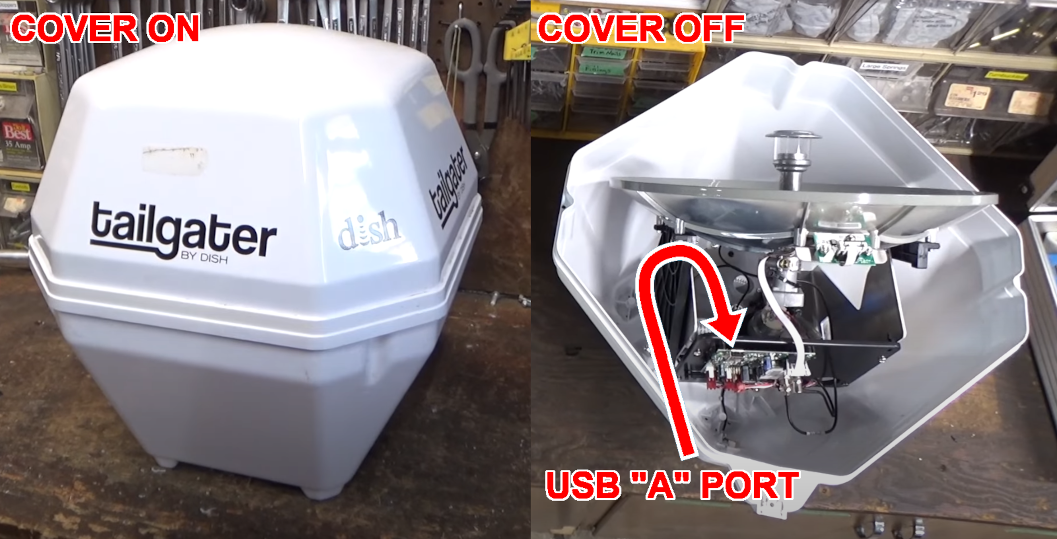
The dish I’m using is a “Tailgater” model, which is another gadget I’ve experimented with before. The particular model I’m using has a USB console port, allowing serial commands to be sent from a Linux or Windows PC. I was able to automate the motor and receiver commands, driving the dish through a set of azimuth and elevation positions while recording the signal strength.
If you’re planning to do this yourself, these dishes can often be found on Craigslist / Facebook for $0-$50. I think I’ve paid an average of $20 each for four of the things so far. The hard part is finding exactly the right one, as there are various models, revisions, and brand names (VuQube, King, and Winegard are some). Some only have RJ11 control ports, which I haven’t experimented with. The one I’m currently using is from 2014 ,has a square-ish case, and you’ll have to unscrew the top and see if it has a USB “A” port. I’ve also encountered one with a Mini USB port, but couldn’t get that one to work. Update: I dried out the damp Mini-USB version and got a serial console with USB cable. The motors are still seized up, but it seems to be much the same as the USB “A” version.The firmware is from 2011 and doesn’t have an “elangle” command, but changing that to “elev” and changing the numbering range in the python code should theoretically work.
This method is great for imaging a room or building, but where it really shines is for detecting and mapping satellites in geosynchronous orbit. These are, after all, the transmitters this dish is designed for. By panning the dish across the Clarke Belt, I can generate a Ku band image of the radio beacons on these satellites.
These images can be overlaid on panoramic photos to show relative satellite locations. This is a great way to troubleshoot a dish installation (for TV, hobbyist, or other use). You can instantly see which satellites are blocked by trees, or which are drowned out by their outer space neighbors. For example, poor little Galaxy 13 in the 127W orbital slot is barely visible as a dim smudge between the high-power beacons of Galaxy 12 and DirecTV 8. No wonder I had so much trouble picking up PBS on my other dish!
I’m not the first to image satellites like this. Professor James Aguirre of the University of Pennsylvania has a Mini Radio Telescope project on Github. The Thought Emporium on Youtube has a similar project. However, both these approaches require more custom hardware and software for antenna aiming. My method just needs an old $20 Tailgater antenna from Craigslist!
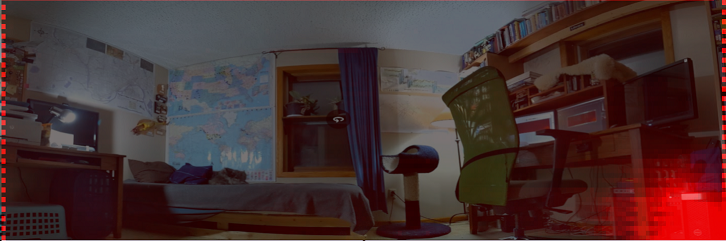
This system can also be used to track down RF leaks. Here’s an indoor scan of my office, overlaid on a panoramic photo of the room. A microwave leak can immediately be seen coming from my poorly-shielded computer tower in the lower right.
If you happen to have one of these Tailgater dishes and want to play around with microwave imaging, check out my Python code at Github. If you’re better at Python that I am, you can probably improve things a bit for your own use 🙂
A take on this project, my version uses a knock-off foam dart blaster. Since the original code is from 2015 and uses some older version of Python and OpenCV, I had to modify a few things. More details below.
I made the following modifications: – Installed Python 3 instead of Python 2. – Installed OpenCV 4 instead of 3. – Skipped the whole virtual environment thing, couldn’t get it working and didn’t seem necessary.
I edited turret.py as follows: – Changed the print statements in turret.py to use Python3 style parentheses – Changed “import thread” to import _thread in line 7 – Changed “thread” to “_thread” in line 423 – Removed “lm,” from line 158 -Changed print syntax on lines 283 and 284 to have the closing parentheses at the end
My modified version of turret.py can be found below:
### Original turret.py file by HackerShack
### from https://github.com/HackerShackOfficial/Tracking-Turret
### Modified 2/16/2022 by Gabe Emerson to work with Python 3

try:
    import cv2
except Exception as e:
    print("Warning: OpenCV not installed. To use motion detection, make sure you've properly configured OpenCV.")

import time
import _thread
import threading
import atexit
import sys
import termios
import contextlib

import imutils
import RPi.GPIO as GPIO
from Adafruit_MotorHAT import Adafruit_MotorHAT, Adafruit_DCMotor, Adafruit_StepperMotor


### User Parameters ###

MOTOR_X_REVERSED = False
MOTOR_Y_REVERSED = False

MAX_STEPS_X = 30
MAX_STEPS_Y = 15

RELAY_PIN = 22

#######################


@contextlib.contextmanager
def raw_mode(file):
    """
    Magic function that allows key presses.
    :param file:
    :return:
    """
    old_attrs = termios.tcgetattr(file.fileno())
    new_attrs = old_attrs[:]
    new_attrs[3] = new_attrs[3] & ~(termios.ECHO | termios.ICANON)
    try:
        termios.tcsetattr(file.fileno(), termios.TCSADRAIN, new_attrs)
        yield
    finally:
        termios.tcsetattr(file.fileno(), termios.TCSADRAIN, old_attrs)


class VideoUtils(object):
    """
    Helper functions for video utilities.
    """
    @staticmethod
    def live_video(camera_port=0):
        """
        Opens a window with live video.
        :param camera:
        :return:
        """

        video_capture = cv2.VideoCapture(camera_port)

        while True:
            # Capture frame-by-frame
            ret, frame = video_capture.read()

            # Display the resulting frame
            cv2.imshow('Video', frame)

            if cv2.waitKey(1) & 0xFF == ord('q'):
                break

        # When everything is done, release the capture
        video_capture.release()
        cv2.destroyAllWindows()

    @staticmethod
    def find_motion(callback, camera_port=0, show_video=False):

        camera = cv2.VideoCapture(camera_port)
        time.sleep(0.25)

        # initialize the first frame in the video stream
        firstFrame = None
        tempFrame = None
        count = 0

        # loop over the frames of the video
        while True:
            # grab the current frame and initialize the occupied/unoccupied
            # text

            (grabbed, frame) = camera.read()

            # if the frame could not be grabbed, then we have reached the end
            # of the video
            if not grabbed:
                break

            # resize the frame, convert it to grayscale, and blur it
            frame = imutils.resize(frame, width=500)
            gray = cv2.cvtColor(frame, cv2.COLOR_BGR2GRAY)
            gray = cv2.GaussianBlur(gray, (21, 21), 0)

            # if the first frame is None, initialize it
            if firstFrame is None:
                print ("Waiting for video to adjust...")
                if tempFrame is None:
                    tempFrame = gray
                    continue
                else:
                    delta = cv2.absdiff(tempFrame, gray)
                    tempFrame = gray
                    tst = cv2.threshold(delta, 5, 255, cv2.THRESH_BINARY)[1]
                    tst = cv2.dilate(tst, None, iterations=2)
                    if count > 30:
                        print ("Done.\n Waiting for motion.")
                        if not cv2.countNonZero(tst) > 0:
                            firstFrame = gray
                        else:
                            continue
                    else:
                        count += 1
                        continue

            # compute the absolute difference between the current frame and
            # first frame
            frameDelta = cv2.absdiff(firstFrame, gray)
            thresh = cv2.threshold(frameDelta, 25, 255, cv2.THRESH_BINARY)[1]

            # dilate the thresholded image to fill in holes, then find contours
            # on thresholded image
            thresh = cv2.dilate(thresh, None, iterations=2)
            c = VideoUtils.get_best_contour(thresh.copy(), 5000)

            if c is not None:
                # compute the bounding box for the contour, draw it on the frame,
                # and update the text
                (x, y, w, h) = cv2.boundingRect(c)
                cv2.rectangle(frame, (x, y), (x + w, y + h), (0, 255, 0), 2)
                callback(c, frame)

            # show the frame and record if the user presses a key
            if show_video:
                cv2.imshow("Security Feed", frame)
                key = cv2.waitKey(1) & 0xFF

                # if the `q` key is pressed, break from the lop
                if key == ord("q"):
                    break

        # cleanup the camera and close any open windows
        camera.release()
        cv2.destroyAllWindows()

    @staticmethod
    def get_best_contour(imgmask, threshold):
        contours, hierarchy = cv2.findContours(imgmask, cv2.RETR_EXTERNAL, cv2.CHAIN_APPROX_SIMPLE)
        best_area = threshold
        best_cnt = None
        for cnt in contours:
            area = cv2.contourArea(cnt)
            if area > best_area:
                best_area = area
                best_cnt = cnt
        return best_cnt


class Turret(object):
    """
    Class used for turret control.
    """
    def __init__(self, friendly_mode=True):
        self.friendly_mode = friendly_mode

        # create a default object, no changes to I2C address or frequency
        self.mh = Adafruit_MotorHAT()
        atexit.register(self.__turn_off_motors)

        # Stepper motor 1
        self.sm_x = self.mh.getStepper(200, 1)      # 200 steps/rev, motor port #1
        self.sm_x.setSpeed(5)                       # 5 RPM
        self.current_x_steps = 0

        # Stepper motor 2
        self.sm_y = self.mh.getStepper(200, 2)      # 200 steps/rev, motor port #2
        self.sm_y.setSpeed(5)                       # 5 RPM
        self.current_y_steps = 0

        # Relay
        GPIO.setmode(GPIO.BCM)
        GPIO.setup(RELAY_PIN, GPIO.OUT)
        GPIO.output(RELAY_PIN, GPIO.LOW)

    def calibrate(self):
        """
        Waits for input to calibrate the turret's axis
        :return:
        """
        print ("Please calibrate the tilt of the gun so that it is level. Commands: (w) moves up, " \
              "(s) moves down. Press (enter) to finish.\n")
        self.__calibrate_y_axis()

        print ("Please calibrate the yaw of the gun so that it aligns with the camera. Commands: (a) moves left, " \
              "(d) moves right. Press (enter) to finish.\n")
        self.__calibrate_x_axis()

        print ("Calibration finished.")

    def __calibrate_x_axis(self):
        """
        Waits for input to calibrate the x axis
        :return:
        """
        with raw_mode(sys.stdin):
            try:
                while True:
                    ch = sys.stdin.read(1)
                    if not ch:
                        break

                    elif ch == "a":
                        if MOTOR_X_REVERSED:
                            Turret.move_backward(self.sm_x, 5)
                        else:
                            Turret.move_forward(self.sm_x, 5)
                    elif ch == "d":
                        if MOTOR_X_REVERSED:
                            Turret.move_forward(self.sm_x, 5)
                        else:
                            Turret.move_backward(self.sm_x, 5)
                    elif ch == "\n":
                        break

            except (KeyboardInterrupt, EOFError):
                print ("Error: Unable to calibrate turret. Exiting...")
                sys.exit(1)

    def __calibrate_y_axis(self):
        """
        Waits for input to calibrate the y axis.
        :return:
        """
        with raw_mode(sys.stdin):
            try:
                while True:
                    ch = sys.stdin.read(1)
                    if not ch:
                        break

                    if ch == "w":
                        if MOTOR_Y_REVERSED:
                            Turret.move_forward(self.sm_y, 5)
                        else:
                            Turret.move_backward(self.sm_y, 5)
                    elif ch == "s":
                        if MOTOR_Y_REVERSED:
                            Turret.move_backward(self.sm_y, 5)
                        else:
                            Turret.move_forward(self.sm_y, 5)
                    elif ch == "\n":
                        break

            except (KeyboardInterrupt, EOFError):
                print ("Error: Unable to calibrate turret. Exiting...")
                sys.exit(1)

    def motion_detection(self, show_video=False):
        """
        Uses the camera to move the turret. OpenCV ust be configured to use this.
        :return:
        """
        VideoUtils.find_motion(self.__move_axis, show_video=show_video)

    def __move_axis(self, contour, frame):
        (v_h, v_w) = frame.shape[:2]
        (x, y, w, h) = cv2.boundingRect(contour)

        # find height
        target_steps_x = (2*MAX_STEPS_X * (x + w / 2) / v_w) - MAX_STEPS_X
        target_steps_y = (2*MAX_STEPS_Y*(y+h/2) / v_h) - MAX_STEPS_Y

        print ("x: %s, y: %s" % (str(target_steps_x), str(target_steps_y)))
        print ("current x: %s, current y: %s" % (str(self.current_x_steps), str(self.current_y_steps)))

        t_x = threading.Thread()
        t_y = threading.Thread()
        t_fire = threading.Thread()

        # move x
        if (target_steps_x - self.current_x_steps) > 0:
            self.current_x_steps += 1
            if MOTOR_X_REVERSED:
                t_x = threading.Thread(target=Turret.move_forward, args=(self.sm_x, 2,))
            else:
                t_x = threading.Thread(target=Turret.move_backward, args=(self.sm_x, 2,))
        elif (target_steps_x - self.current_x_steps) < 0:
            self.current_x_steps -= 1
            if MOTOR_X_REVERSED:
                t_x = threading.Thread(target=Turret.move_backward, args=(self.sm_x, 2,))
            else:
                t_x = threading.Thread(target=Turret.move_forward, args=(self.sm_x, 2,))

        # move y
        if (target_steps_y - self.current_y_steps) > 0:
            self.current_y_steps += 1
            if MOTOR_Y_REVERSED:
                t_y = threading.Thread(target=Turret.move_backward, args=(self.sm_y, 2,))
            else:
                t_y = threading.Thread(target=Turret.move_forward, args=(self.sm_y, 2,))
        elif (target_steps_y - self.current_y_steps) < 0:
            self.current_y_steps -= 1
            if MOTOR_Y_REVERSED:
                t_y = threading.Thread(target=Turret.move_forward, args=(self.sm_y, 2,))
            else:
                t_y = threading.Thread(target=Turret.move_backward, args=(self.sm_y, 2,))

        # fire if necessary
        if not self.friendly_mode:
            if abs(target_steps_y - self.current_y_steps) <= 2 and abs(target_steps_x - self.current_x_steps) <= 2:
                t_fire = threading.Thread(target=Turret.fire)

        t_x.start()
        t_y.start()
        t_fire.start()

        t_x.join()
        t_y.join()
        t_fire.join()

    def interactive(self):
        """
        Starts an interactive session. Key presses determine movement.
        :return:
        """

        Turret.move_forward(self.sm_x, 1)
        Turret.move_forward(self.sm_y, 1)

        print ('Commands: Pivot with (a) and (d). Tilt with (w) and (s). Exit with (q)\n')
        with raw_mode(sys.stdin):
            try:
                while True:
                    ch = sys.stdin.read(1)
                    if not ch or ch == "q":
                        break

                    if ch == "w":
                        if MOTOR_Y_REVERSED:
                            Turret.move_forward(self.sm_y, 5)
                        else:
                            Turret.move_backward(self.sm_y, 5)
                    elif ch == "s":
                        if MOTOR_Y_REVERSED:
                            Turret.move_backward(self.sm_y, 5)
                        else:
                            Turret.move_forward(self.sm_y, 5)
                    elif ch == "a":
                        if MOTOR_X_REVERSED:
                            Turret.move_backward(self.sm_x, 5)
                        else:
                            Turret.move_forward(self.sm_x, 5)
                    elif ch == "d":
                        if MOTOR_X_REVERSED:
                            Turret.move_forward(self.sm_x, 5)
                        else:
                            Turret.move_backward(self.sm_x, 5)
                    elif ch == "\n":
                        Turret.fire()

            except (KeyboardInterrupt, EOFError):
                pass

    @staticmethod
    def fire():
        GPIO.output(RELAY_PIN, GPIO.HIGH)
        time.sleep(1)
        GPIO.output(RELAY_PIN, GPIO.LOW)

    @staticmethod
    def move_forward(motor, steps):
        """
        Moves the stepper motor forward the specified number of steps.
        :param motor:
        :param steps:
        :return:
        """
        motor.step(steps, Adafruit_MotorHAT.FORWARD,  Adafruit_MotorHAT.INTERLEAVE)

    @staticmethod
    def move_backward(motor, steps):
        """
        Moves the stepper motor backward the specified number of steps
        :param motor:
        :param steps:
        :return:
        """
        motor.step(steps, Adafruit_MotorHAT.BACKWARD, Adafruit_MotorHAT.INTERLEAVE)

    def __turn_off_motors(self):
        """
        Recommended for auto-disabling motors on shutdown!
        :return:
        """
        self.mh.getMotor(1).run(Adafruit_MotorHAT.RELEASE)
        self.mh.getMotor(2).run(Adafruit_MotorHAT.RELEASE)
        self.mh.getMotor(3).run(Adafruit_MotorHAT.RELEASE)
        self.mh.getMotor(4).run(Adafruit_MotorHAT.RELEASE)

if __name__ == "__main__":
    t = Turret(friendly_mode=False)

    user_input = input("Choose an input mode: (1) Motion Detection, (2) Interactive\n")

    if user_input == "1":
        t.calibrate()
        if input("Live video? (y, n)\n").lower() == "y":
            t.motion_detection(show_video=True)
        else:
            t.motion_detection()
    elif user_input == "2":
        if input("Live video? (y, n)\n").lower() == "y":
            _thread.start_new_thread(VideoUtils.live_video, ())
        t.interactive()
    else:
        print ("Unknown input mode. Please choose a number (1) or (2)")
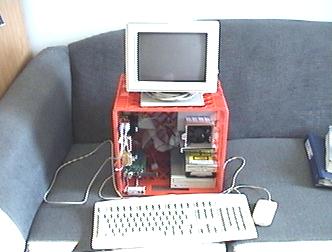
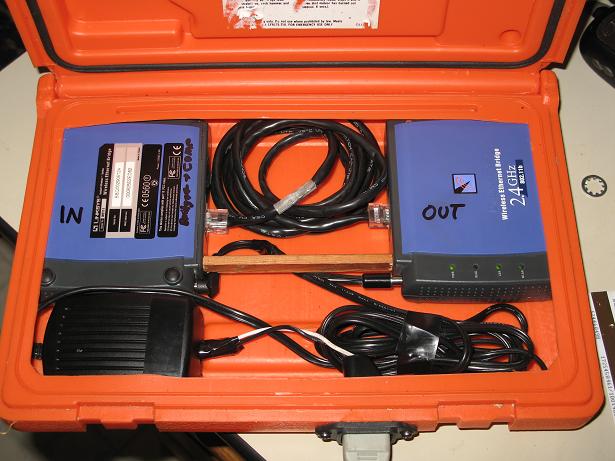
Given my long history of doing unwise and silly things to computers, a cyberdeck was inevitable. After all, I’ve turned a milk crate into a PC case, a Mac into a fish tank, a flare gun case into a wifi repeater, and so on.
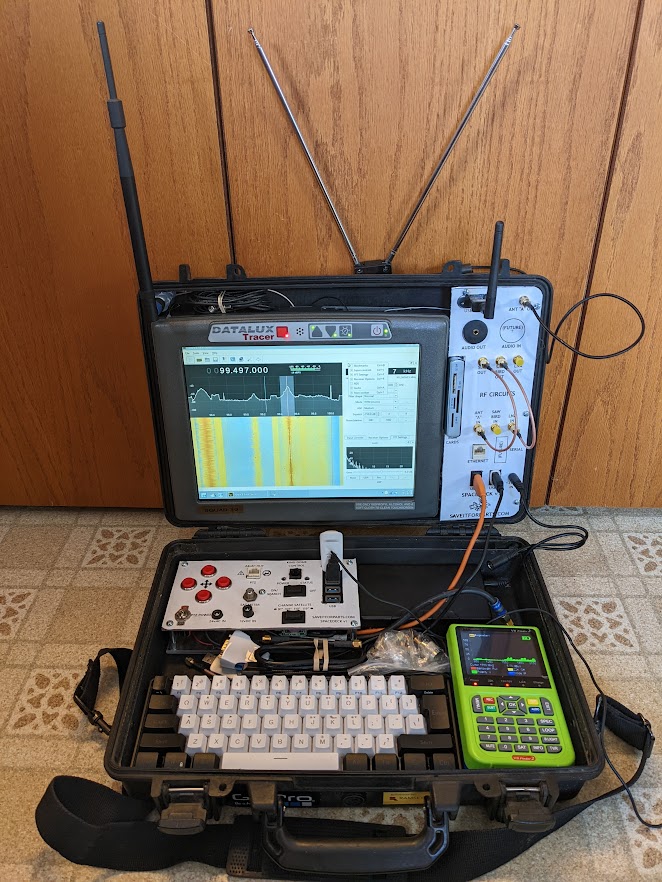
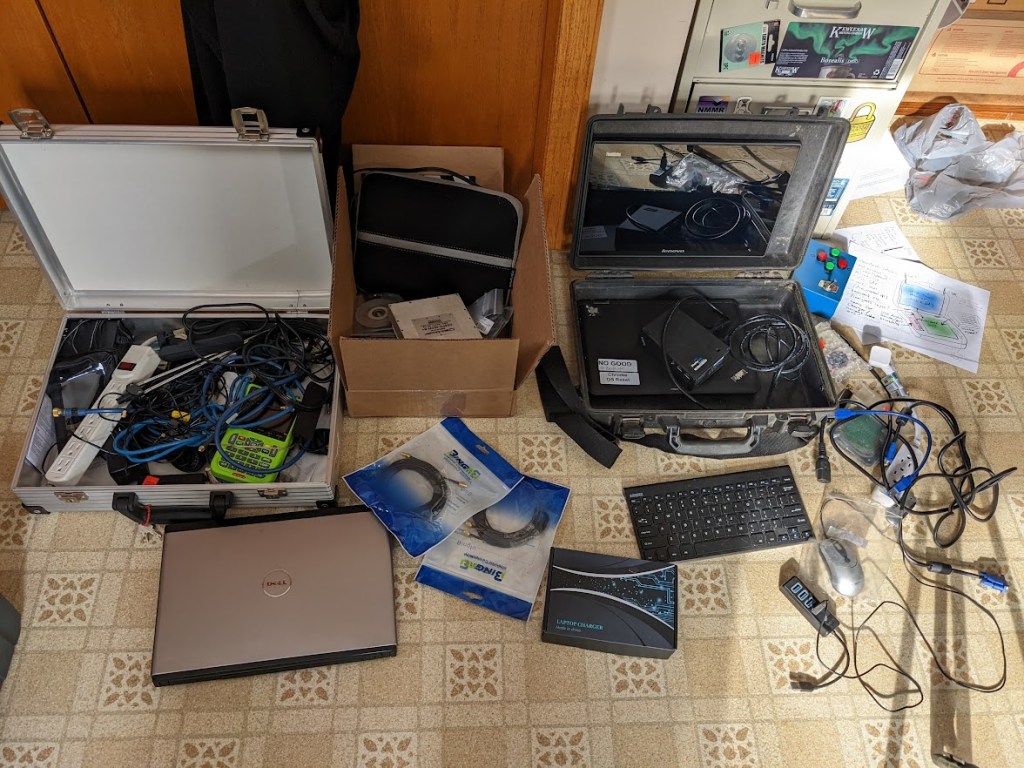
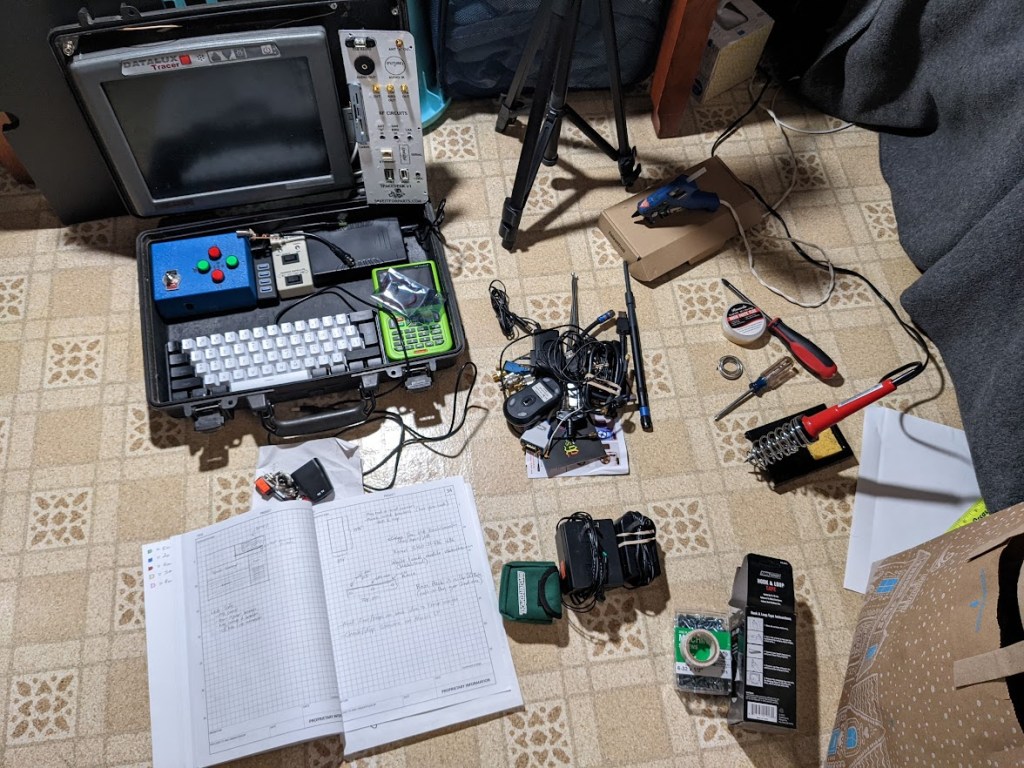
Since I’ve been doing a lot of stuff with old satellite dishes lately, I figured it was time for a more organized, self-contained control and receiver setup. The result is above, made from a surplus police car computer, digital satellite meter, various software-defined radio stuff, and nearly the entire contents of multiple spare parts bins.
Believe it or not, this started out almost modern, with netbooks, SSDs, USB 4.0, Displaylink screen, etc. None of which worked the way I wanted. As usual I fell back on older and more familiar hardware. Everything in the current cyberdeck version is Windows-XP era. I’m actually using Q4OS Linux, but it looks and feels just like Windows XP!
The whole thing probably cost under $50, as most of it was stuff I already had lying around. I did spend the big bucks on a new 60% keyboard and a couple battery packs. The hardware includes:
– Touchscreen computer – RTL-SDR radio – Various filter / amp modules – Various WiFi modules – Satellite Meter / digital video player – PTZ control for my older dish pointers – LNB power injector – King-Dome / Vuqube control – Panel-mount port interfaces
The system is fairly modular and expandable, with most major components simply stuck in with velcro tape. If I want to swap modules for a different experiment, I can just pop them out and replace with something else. Most of the ports and controls are exposed in two custom-made panels. A friend asked if I were getting these laser cut… nope, just plexiglass on the table saw, print the layout on a vinyl sticker, and slap em together!
As usual, my finish and quality control are… questionable at best. I am more of a duct-tape, hot glue, and hammer artist than a fine detail artist.
You can check out the build video and some demos of this unit’s abilities on my Youtube channel! I also have a bunch of other videos of satellite-related projects and stuff, with more to come!
Starlink has been in the news a lot lately, partly for its revolutionary satellite internet service and partly for its supposed impacts on astronomy. While I can’t afford an actual Starlink ground station / Dishy, I heard that some of their transmissions are detectable with common household items! Well, maybe common for me, with a garage full of electronics garbage. And only the beacon or tracking signals, not the actual internet data.
Anyway, all you need for this is a software defined radio (SDR) like this one, and a universal satellite dish LNB like this. You don’t even need the actual dish, the Starlink satellites are so low and broadcast so strongly that the LNB by itself can hear them.
I’ve always liked spud cannons, in fact they’ve made up some of the earliest content on this site. Behold the 2004-ish MS-Paint monstrosity!
Anyway, I’ve been slowly upgrading my starch-based artillery, including the Potato Howitzer previously posted. Finally I took things a step farther, with this fully mobile potato tank!
Lately I’ve been building some small wind generators out of scrap material. So far they haven’t been all that efficient (or even very sturdy). Eventually I’d like to get something that will hold up to the local weather and generate a little power. It doesn’t have to be much power, just enough to charge a phone or run a small device like a Wifi hotspot would be fine.
The first design was a traditional (sort of) windmill. The blades are from an old ceiling fan, so it’s not optimized for wind power the way real airfoils would be. The generator/alternator was an old electric drill, with a 90-degree adapter as the pivot and mechanical power transfer.
This one worked OK, but didn’t hold up to the weather and I still haven’t found all the pieces under the snow!
Version two is a vertical-axis turbine made from old plastic barrels and a scooter motor. It’s currently installed at Sandland and may or may not survive until my next visit!
Version 3, if and when I get around to it, might be a combination of the horizontal blades, a better alternator, and a slip ring for pivoting. That last bit is what’s hard to DIY, so I may just have to buy a real one.
Building a small submarine or ROV is something I’ve been meaning to do for years. I finally got around to throwing some parts together, and it turned out surprisingly functional. There are still a few kinks to iron out, but this contraption of PVC pipe and surplus electronics actually works!
The outer frame is made of PVC pipe, holding a central electronics box with the navigation camera and thrusters. The navcam feeds live video back to a screen on the control panel (when it’s working!). For better quality video, there’s a GoPro mount on the front. Lights on the front let the cameras see better underwater or in dark caves (where I’ve mostly been testing it so far).
The first cave test (above) was admittedly pretty low-stakes. The water in this cave is all pretty shallow and if I got the thing stuck I could have just waded out to retrieve it. However, I wanted to verify operations for a slightly more challenging cave (below).
I’m hoping to use this in a few more places (maybe when the weather is warmer and the thrusters don’t ice up!). I’ll probably also fix a few of the broken bits and adjust things further, so look for more on the ROV project in the future!
Youtube has really been pushing its new-ish “#shorts” feature, probably in an attempt to compete with a certain vertical-video app. Since they keep pushing me to do it, here are some short versions of my popular videos (plus a few short-only features!).


 Posted by saveitforparts
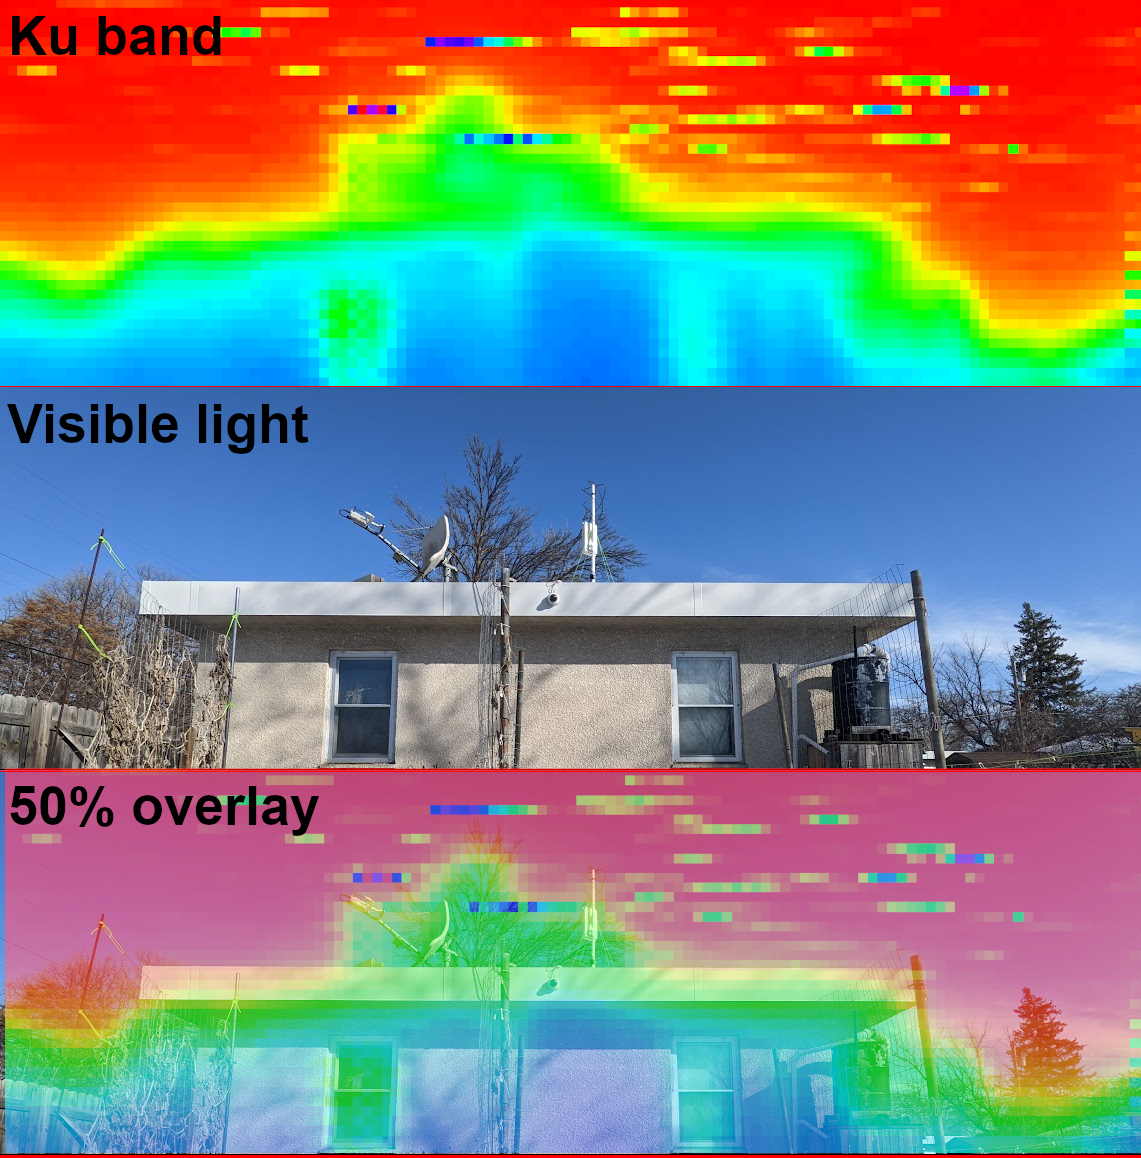


