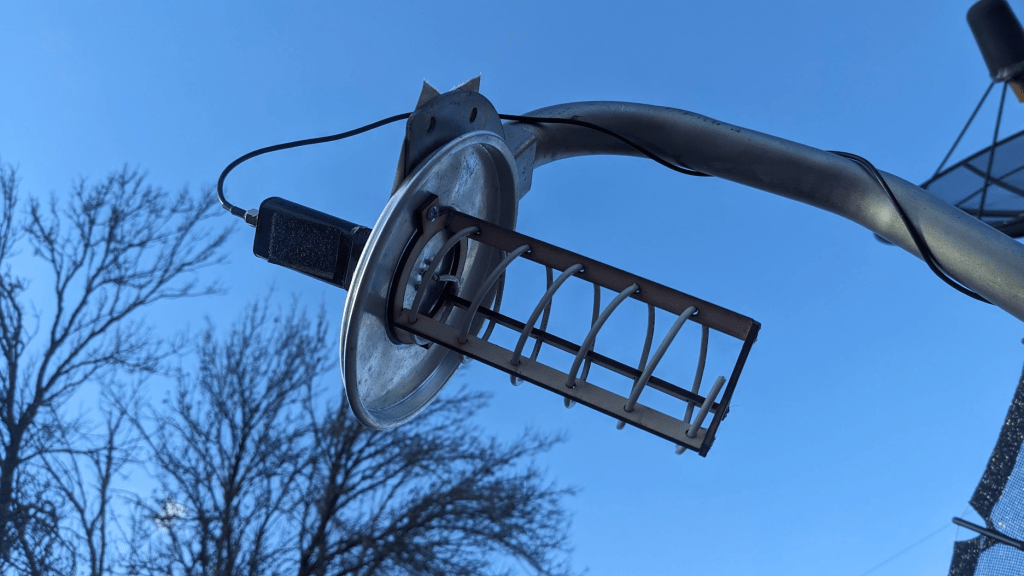
Since I also have a laser cutter, I decided to try making one out of wood. It’s pretty simple, but works decently well! This one is a left-hand version, but could probably be a right-hand spiral by swapping two of the uprights. In addition to the wood pieces, it needs some kind of ground plane (I used an aluminum pan lid), some stiff wire (I pre-coiled around a 1/5″ PVC pipe), an SMA connector, and an LNA (I like the Nooelec SAWBird+GOES for L-band: https://amzn.to/41CO8sG).
(You also need a satellite dish, but hopefully you already have that if you’re looking for helical feeds!).
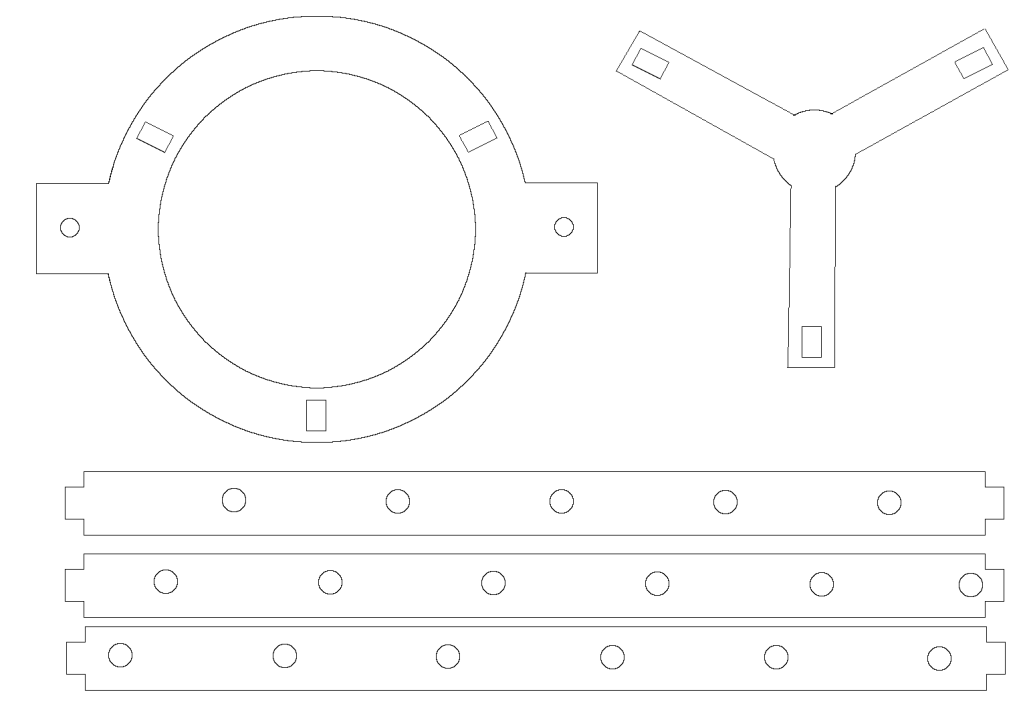
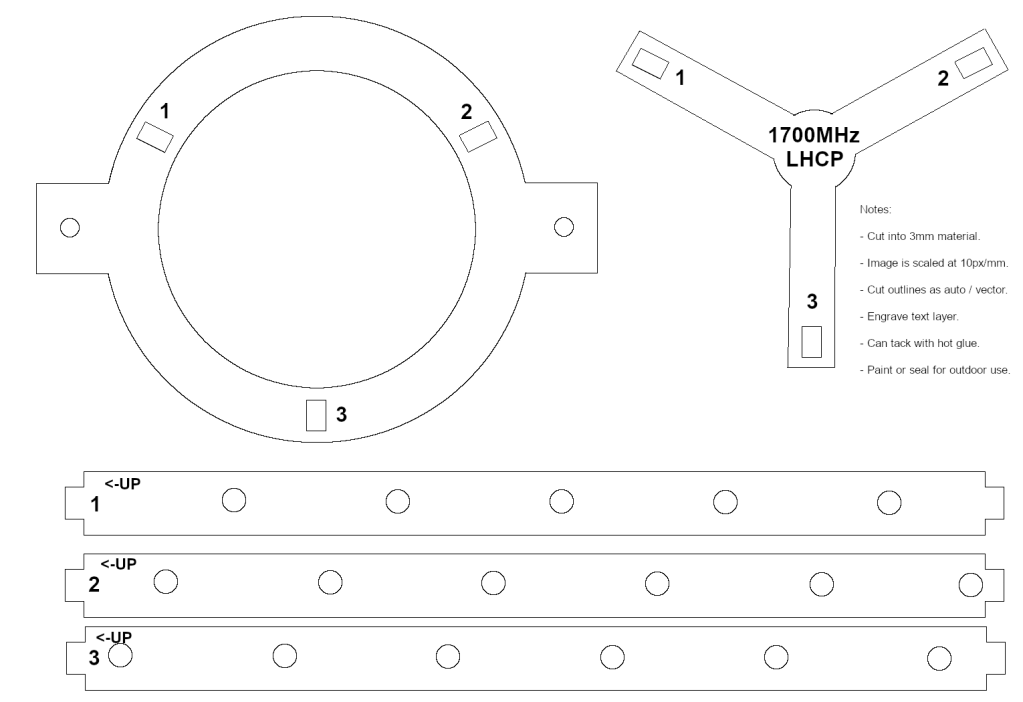
Or just use the images below. These are sized for 3mm wood, and scaled to 10px/mm. The engrave file can be burned as a raster with engrave power to mark which pieces go where, and the cut file used as a vector / centerline at cutting power.
Below is a preview image of what the full cut and engrave should look like (don’t use this file with the laser).
Mine came out a little loose, I tacked it together with hot glue and then more permanent glue. If you use thicker or thinner material you might have to edit the image to re-size some holes and/or tabs.
As far as where to find one of these, you’re on your own! Another local radio amateur gave me this one, and I’ve never seen them on the used market. Apparently a company called Sub-Lunar makes modern versions, which you can find at https://sub-lunar.com/products. Sadly they don’t list any prices, and if you have to ask…
I discuss a variety of satellite and radio projects on my YouTube channel. Satellite tech has become the most popular topic on my channel, even though it’s not what I initially started with! I often get questions from viewers along the lines of “how do I get started in this hobby?”. Personally, I bought the cheapest possible Software-Defined Radio (SDR) and just started messing with it! I’ve since moved on to slightly better SDRs, but there’s a lot you can do with just a $15-$20 unit from eBay and some creativity.
I usually try to include links and details in the descriptions of my videos, but I don’t always make “how-to” or instructional videos. Usually when I film a project, I’m learning right as I’m doing the project, and viewers are seeing me develop a skill as I do it. This isn’t the most efficient way to teach something, as I make plenty of mistakes along the way! My personal learning style involves a LOT of trial-and-error. My projects also involve a significant amount of dumpster-dived material and equipment, so it can be hard to make a “parts list” for someone to replicate what I did!
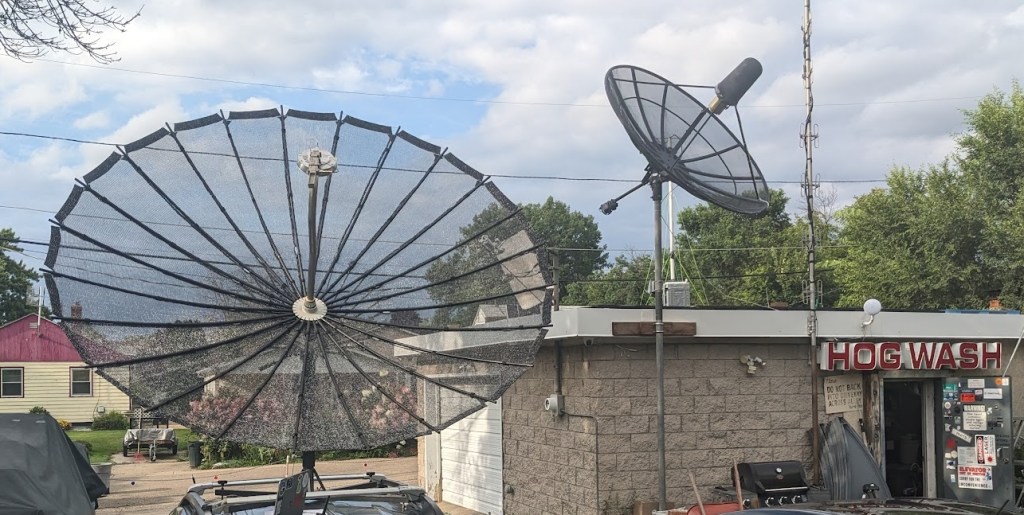
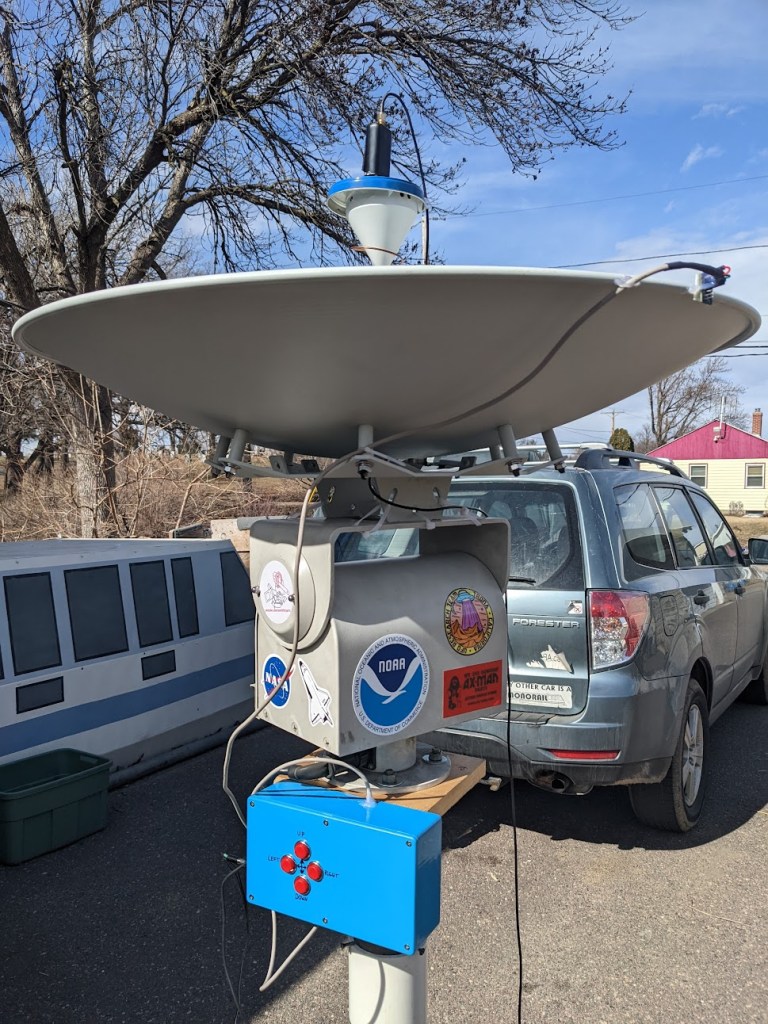
Fig 2: A portable / RV satellite dish re-purposed for different frequencies.
If you are just starting out with the amateur satellite hobby, there are a couple directions you can go. If you’re an amateur (ham) radio operator or just into listening to radio traffic, you can get into amateur repeater satellites pretty easily. The International Space Station is the most powerful and easiest to start with. Some info about that is in the list below.
If you want to start tracking and decoding weather satellites, the low-Earth-orbit Meteor series is probably the easiest to start with. Previously some of the US NOAA satellites used VHF, but the ones with this capability have been retired, so some of the info about them is outdated. As of early 2026, Meteor M2-3 and M2-4 can be received on VHF frequencies with a Software-Defined Radio. Images can be decoded with simple software like SatDump. Once you’re experienced with VHF you can upgrade to the L-band signal available from the same satellites (and some others), although this takes a little more effort and equipment.
If you want to try geostationary satellites, the GOES series (in the Western hemisphere) is a great place to start. However, you will need to find or make a satellite dish slightly larger than what’s normally found on houses today. More info and links are below.
The list below is my attempt to compile helpful resources and links related to satellite experimenting, “hacking”, or other hobby-level activities. Some of these are things I’ve written or filmed, and some are links that have helped me learn.
How to find free satellite dishes: https://www.youtube.com/watch?v=_qX30ayOcDU TLDW: Craigslist, Facebook Marketplace, and estate sales/auctions are great places to try! You can also contact local TV stations and ask if they have old ones. Or you can post on a classified site offering to remove old unwanted dishes from someone’s yard.
Combination dish and radio setup for GOES and L-band satellites: https://amzn.to/3YdsiKD (I have not personally used this entire combo, but I’ve heard good things about it).
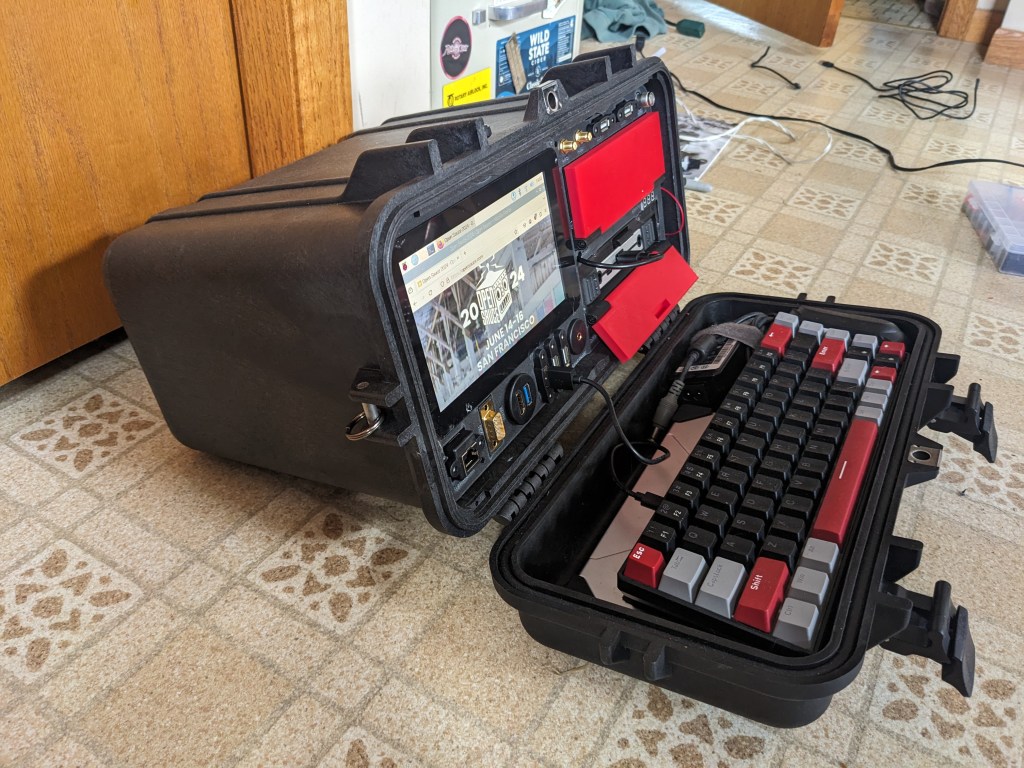
There’s something about the 1980s “Luggable” computer form factor that just gets me. Maybe its because I always wanted one in the ’80s, or the retro-future look, or just the convenience of having all your ports and interfaces conveniently on the front. Whatever it is, I’ve been sketching out designs for a DIY version for a while now.
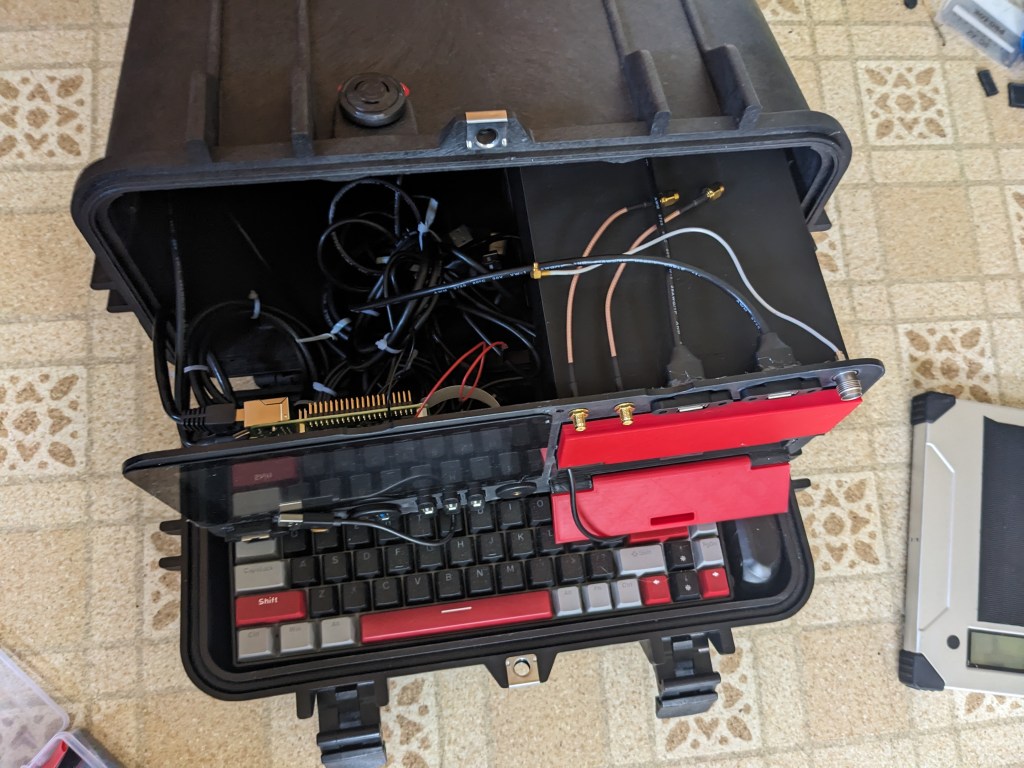
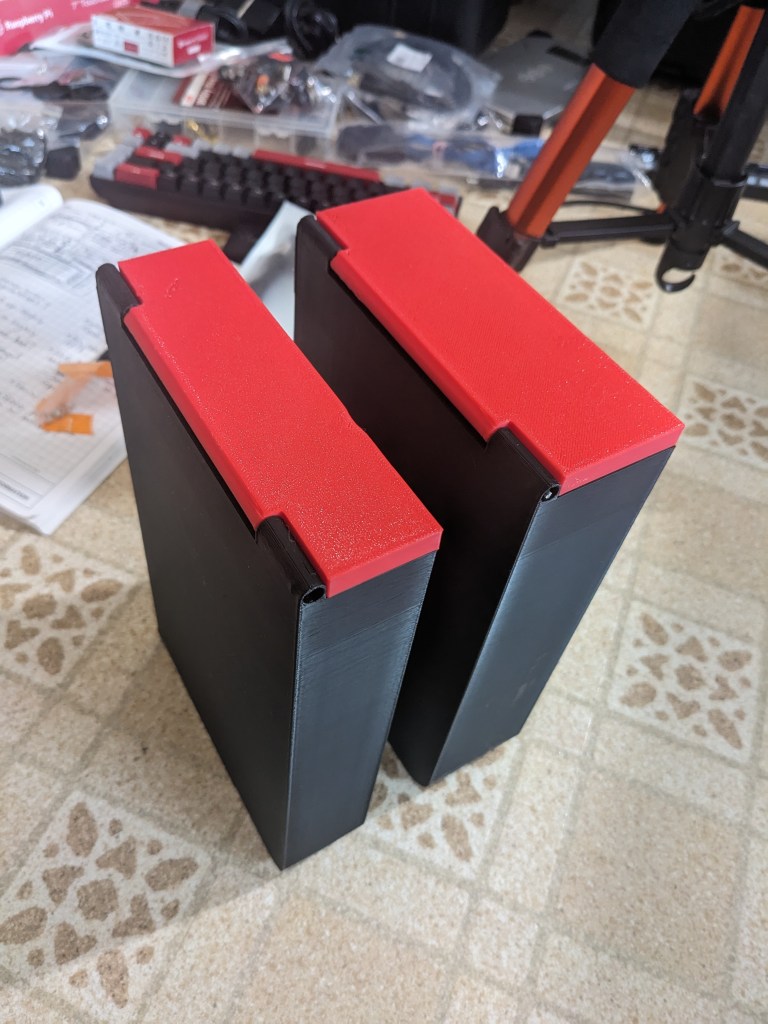
This version uses a Pelican 1340 case, slightly modified to remove some internal lumps and protrusions. The brain is a Raspberry Pi 4 with 7″ screen. I laser-cut a custom front panel and 3D-printed the “Drive Bays” (files available here: https://www.thingiverse.com/thing:6672979)
The larger top “drive bay” holds an accessory set (adapters, SDR, etc) store in a small tackle box. The bottom bay holds a Voltaic V88 battery pack. I picked up a few of these at a local surplus auction and I really like them. They are small enough to be legal in carry-on luggage, but powerful enough to keep the Raspberry Pi running for 4+ hours. They can output a variety of voltages through the barrel plug, can be charged with various input voltages, and can also output USB QC and USB C. They’re all-around a great external battery for your laptop or projects like this.
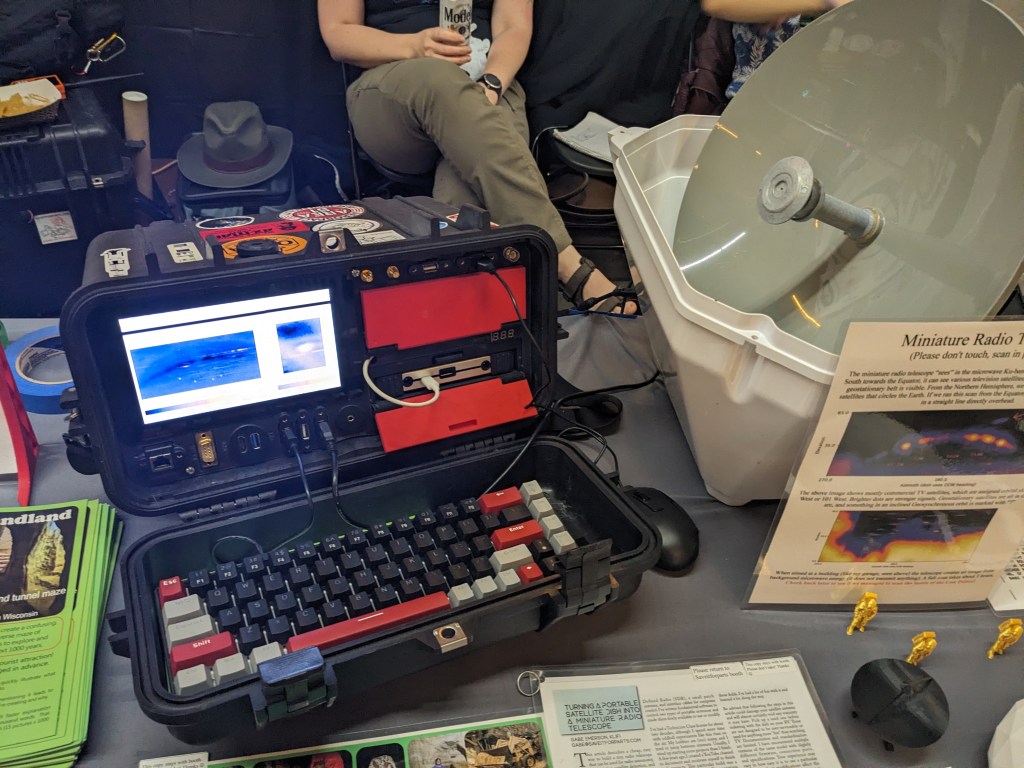
The Cyberdeck is great for running my satellite antennas and other SDR projects. Despite not having much cooling and being a black case, it seems to run just fine outside in the sun. And yes, I have an old bathtub in my yard next to the satellite hacking deck. I guess I’m a space redneck or something.
Almost immediately after building this deck, I found a real live Osborne 1 luggable at another auction. That will appear in a future video as soon as I re-cap the power supply.
This cyberdeck is great not only for my satellite experiments on the go, it was also a fantastic part of my exhibit booth at Open Sauce 2024, a Youtube/maker/science convention in San Francisco. I used the deck to run one of my hacked satellite antennas for microwave imaging. It was a real attention-grabber at the booth and I think more people may have stopped to look at the deck vs the dish!
The build video for this cyberdeck can be found below:
A few weeks ago I was invited to write an article for the AMSAT Journal, an online magazine of amateur satellite communications. The article is now out, in the January/February issue! You can see my article below, or you can subscribe to the journal to read all the articles in this issue and back issues! It’s a fascinating magazine, and I just subscribed myself!
I’ve wanted an azimuth/elevation mount for a while, but never had the money for a real one! Even used models go for $700 and up, so the sticker shock always kept me away. Building my own always seemed complicated and confusing, since it combined all the skills I’m only sort of OK at. Aligning motors, balancing things, programming motion, reading a sensor, and automating the whole rig just seemed like a lot of work!
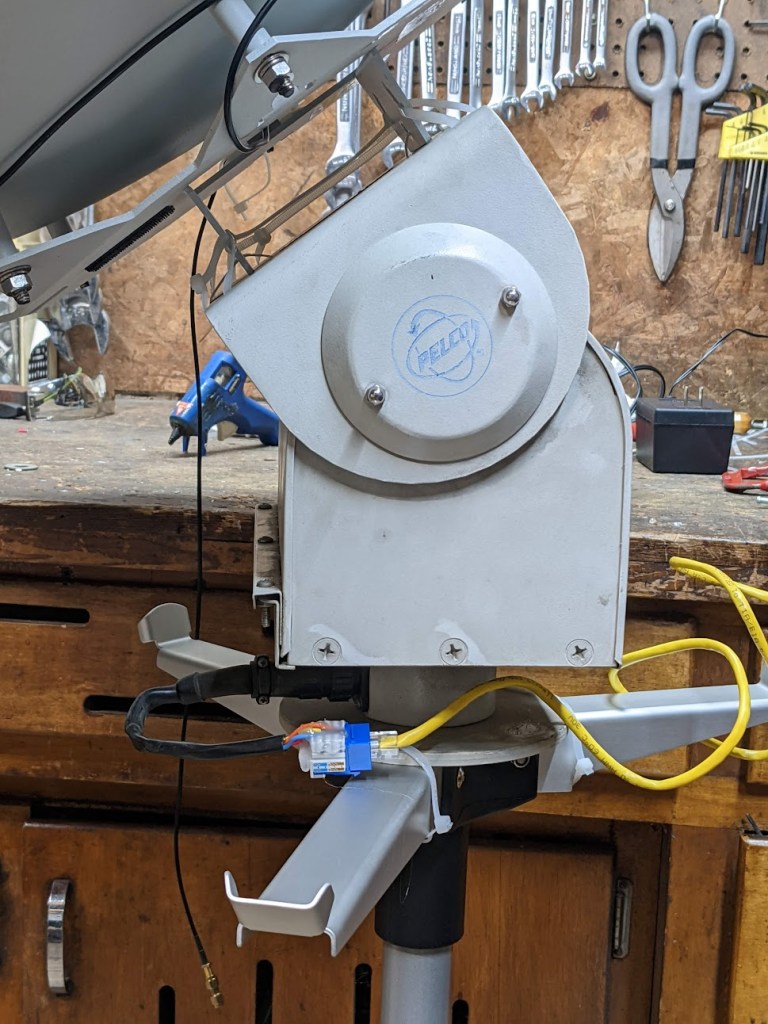
Fortunately, a few factors made this project relatively easy! First, I got a used pan/tilt camera mount from Ax-Man Surplus. This is a nice robust unit designed to move old-fashioned heavy security cameras, so it can take some weight and doesn’t need too much balancing.
Next, I discovered I could modify the design and code from the SARCNET Mk1 Tracker to use this camera mount. The original project had options for different motors, including a homemade mount assembly and a pair of regular old TV antenna rotors. My camera mount was functionally and electrically similar enough to a pair of rotors that it worked just fine! The main modification I did to the mount was to remove the side cover and slide the vertical limit switches farther apart. This lets me move the mount a full 180 degrees. So far the tracking software hasn’t needed to go a full 180, for overhead passes it just spins the dish and then goes back down the other side. If your camera mount can do a 90-degree elevation, that should be sufficient.
The SARCNET project is aimed at Yagi-Uda antennas for 2m and 70cm (VHF/UHF). This is a typical setup for contact hamsats and talking through the amateur radio repeater on the International Space Station. I wanted to use a parabolic dish for L-band (~1700Mhz). That would let me receive images from satellites like the NOAA POES series, Russian METEOR series, European METOP satellites, etc. While some of these satellites also transmit images on VHF, the L-band signals are higher bandwidth, higher-quality images and contain more data. The VHF signals can be received with a stationary antenna like my QFH rig, but L-band usually requires an aimed directional antenna that tracks the satellite as it passes overhead.
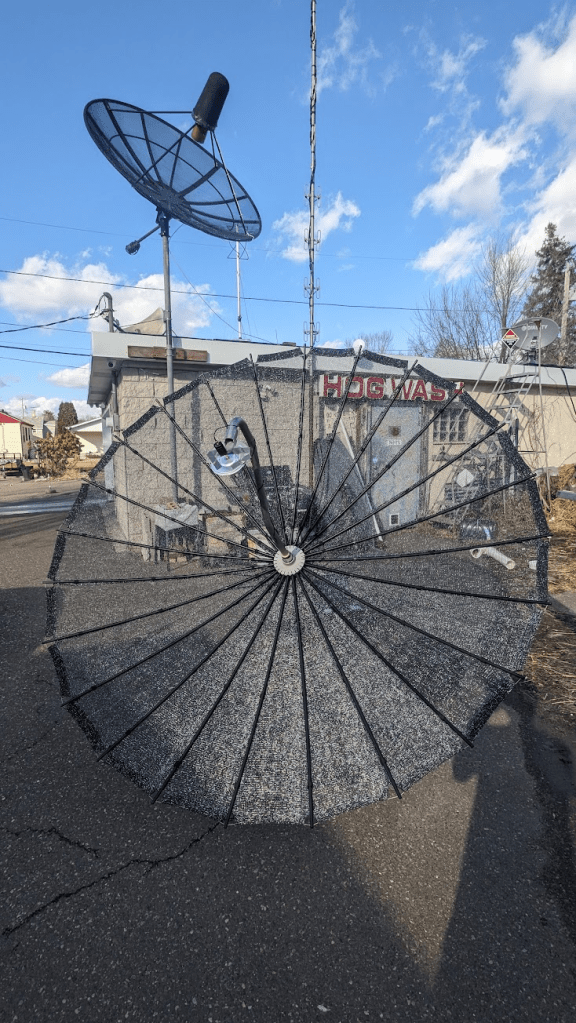
My take on the SARCNET Rotator worked great with a dish! I’ve used this dish for other projects in the past, it was originally a 5.8ghz wireless network antenna, given to me by another local ham. This project would also work with a Wifi grid dish or any small lightweight antenna (even an umbrella covered in foil!). Note that this is a pretty beefy pan/tilt mount, mine is a model PT570. It can handle my reflector without any counterweights, but if you use a lighter-duty camera mount you may need to balance it with a weight opposite the dish. Some larger pan/tilt mounts do exist, and some apparently have built-in position sensors. Mine just has 5 wires for control. One common, and one for each of the 4 motion directions.
My control box was also slightly different than what SARCNET used. I had a slightly different Arduino, and I couldn’t find the Triac control board they suggested. I ended up using relays to run the motor, which seems to work just fine. The things do make a lot of clicking and clunking at low speed and for fine tuning, so hopefully I’m not wearing them out too fast! They only cost a few dollars on Amazon, so I’m not too concerned. I’m using the same sensor suggested by SARCNET (the LSM303DLHC). Calibrating it is a little fiddly and took me a couple tries. They have a video about the process here.
My wiring is pretty messy in the above photo, so here’s a diagram of what I did:
I mounted the parabolic dish flat on the top of the camera mount, and placed the sensor at the rim of the dish. My reflector is made of aluminum, so it doesn’t affect the sensitivity of the accelerometer / compass chip. I had previously tried placing it closer to the base of the dish, but the sensor was confused by the motors in the camera mount.
For the radio system, I’m using an RTL-SDR Blog v4 on a laptop, connected to a Nooelec SAWBIRD GOES on the dish (these links give me a small Amazon kickback if you buy from them!)
I followed the Compilation and Set To Work instructions on the SARCNET website. Once the Arduino code is loaded, and I had Hamlib and Gpredict on my PC, my procedure for use is as follows (using Linux):
Ensure rotor has enough play to follow sat (check position of cut-off switches underneath)
Connect SDR
Connect 24V AC to pointer
Connect USB from pointer to PC, Dish will rotate to Az 0, El 0.
Open terminal, run “rotctld -m 202 -r /dev/ttyACM0 -s 9600 -C timeout=500 -vvv -T 127.0.0.1 -t 4533”
Open Gpredict
Select / open desired module
Options -> Antenna Control
Select target sat and click “Track”
Select rotator device (“MediumDish”) and click “Engage”
Dish will run to initial Acquisition of Signal (AOS) position and wait
If serial connection crashes (rotctld window start showing errors and dish stops moving)
Unplug 24v
unplug and re-plug USB
Ctrl-C rotctld and re-run. May need to change ACM0 to ACM1
Go back to Gpredict rotator controller and re-select “Track” and “Engage”
Re-connect 24v
Settings for Gpredict:
In Preferences -> Interfaces -> Rotators
Host: 127.0.0.1
Port: 4533
Azimuth type: 0->180->360
Recording and processing the satellite pass is the same as with a handheld dish. I use N2YO.com to look for upcoming passes (Select your satellite, like NOAA 18, click on “10 Day Predictions”, then “All Passes”, and look for ones with a high El number for the max altitude. My procedure for each pass is as follows:
Select the SDR device (sometimes I have to refresh), make sure the sample rate is as high as you can go (2.56Mhz for the RTL-SDR) and click the Play button at the top.
Make sure the BIAS-T function is checked. Sometimes I need to do this several times to get the power light on the SAWbird filter to come on
Set the gain, I sometimes start with max and drop it as the signal improves, or you can use AGC or whatever works best for you
Set recording settings to Baseband, WAV, Int16
When the satellite is in view and the antenna is tracking, click “Record”
When the signal drops and the pass is over, stop recording
Select the appropriate satellite pipeline from the list at the top
Set the Input File to the baseband recording I just made
Set the Output Directory to wherever I want the images to go (I usually make a new folder for each satellite and pass)
Make sure the Baseband Format and Samplerate are the same as SDR++ (this should automatically update once the Baseband recording is loaded)
Click Start
Once the processing is done, open the Output Directory and see what I got!
As with all of my projects, this too plenty of trial and error, and didn’t work right on the first few tries. Eventually everything came together and worked smoothly! I’m looking forward to repeating this with some other types of antennas, like VHF/UHF Yagis. I’m also planning to do a bigger dish in the near future!
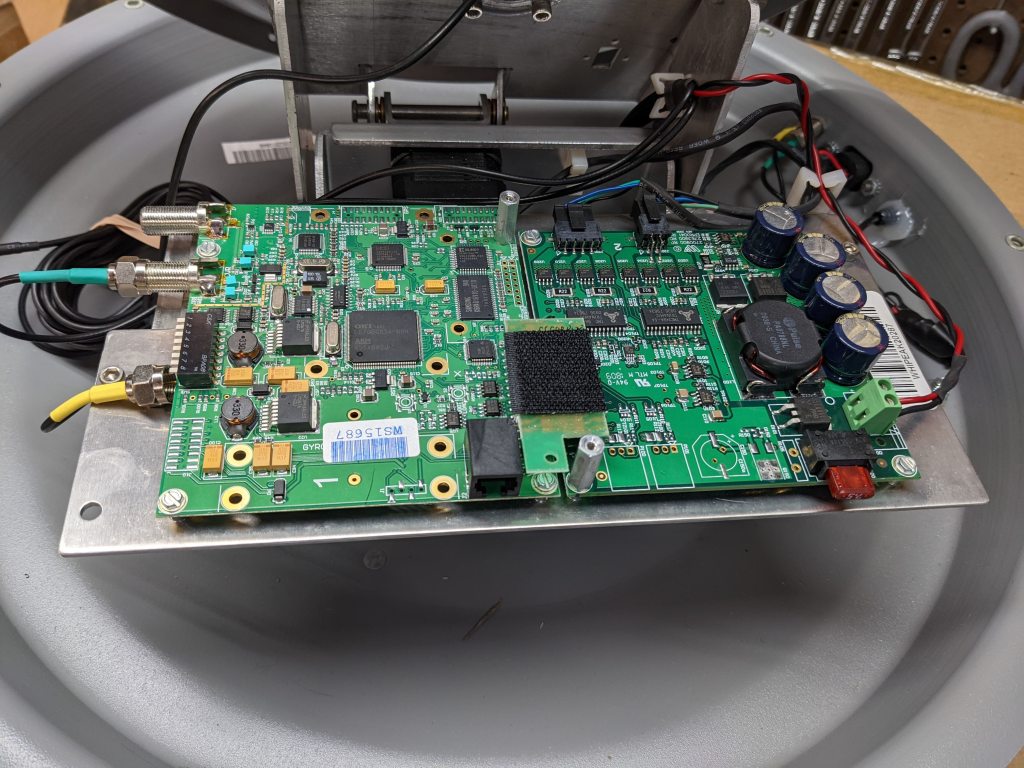
It appears to have an ARM-based control board with a stepper motor daughterboard. The only interface I’ve been able to use is an obscure RS-485 to RJ25 jack.
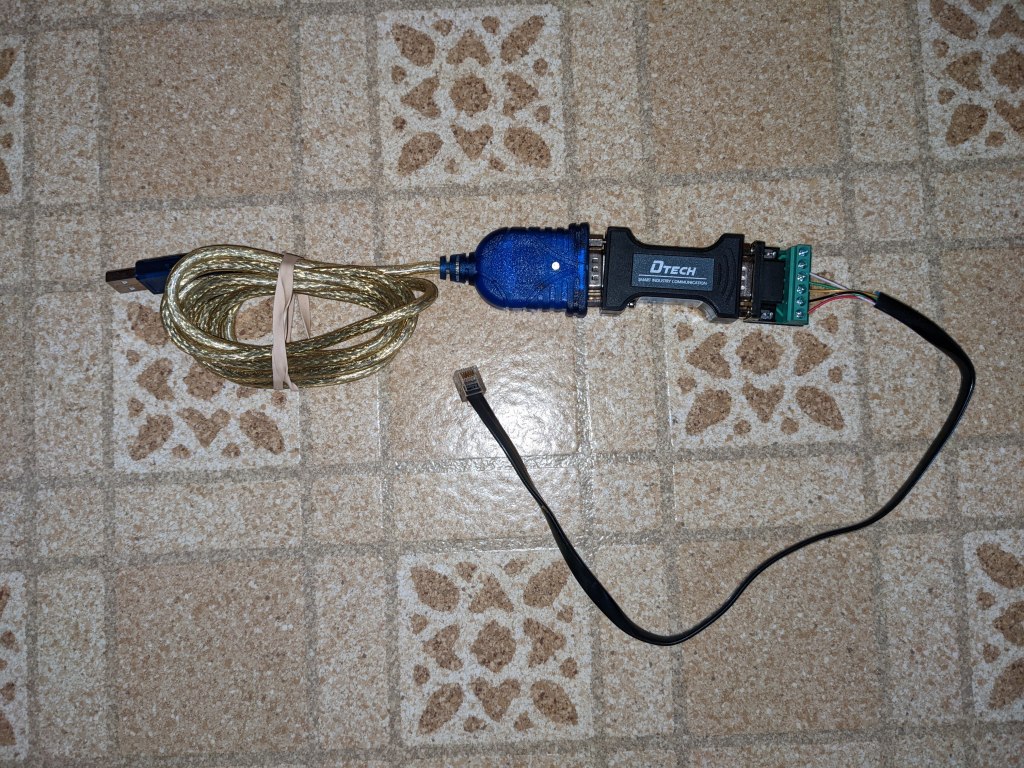
I had initially showed this on my Youtube channel, and then shoved it onto the ever-growing “to-do” pile. A viewer commented that they could get a serial console with some cable adapter trickery. A USB-to-RS232 cable goes to a Dtech RS232-RS485 adapter, then to a custom RJ-25 cable (6-conductor phone cord). It looks like this:
I was able to duplicate this and connect to the console port on the antenna’s brain. I modified my Dish Tailgater code to drive the dish and read signal strength. This time, instead of using the onboard Ku-band LNB, I stuck an L-band patch antenna on the dish and used a Software Defined Radio to read the signals.
I’m using an RTL-SDR Blog V3. They seem to be out of stock, but you can get the RTL-SDR Blog v4 for the same price! (link goes to my Amazon affiliate page and gives me a commission if you buy one)
Here’s some info on the L-band patch I’m using. These little antennas are $5 at Ax-Man surplus, or you can find them on eBay.
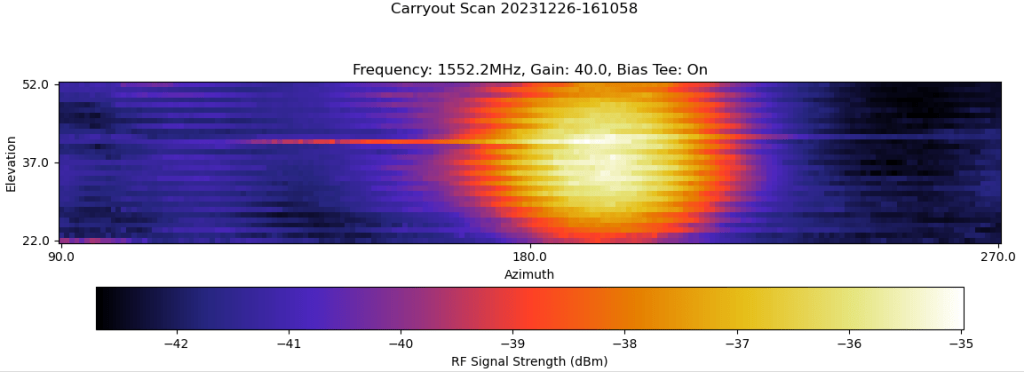
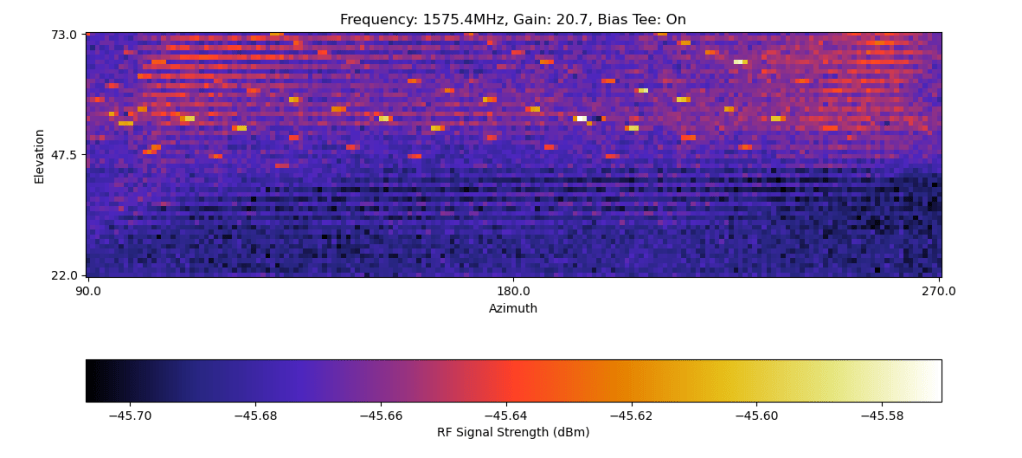
After about two weeks of struggling with the code, feed, motor indexing, and other issues, I finally got a couple images of various L-band satellites. This is what the satellites look like in radio frequencies as they pass over my location.
First up is Inmarsat-4 F3. This is a geostationary satellite, so to me it looks like a fixed point source in the sky:
Next are some navigation satellites. These are in Medium Earth Orbits, so they move slowly enough (from my viewpoint) that the dish caught them multiple times along their orbital tracks. This frequency is used by GPS, European Gallileo, and Chinese Beidou satellites, so I could be seeing a combination of different systems (Russian satellites use a different frequency).
Here’s my attempt to trace each path in MS-Paint for more clarity:
And finally, here’s a Low-Earth-Orbit Iridium satellite. This went over pretty quickly and appears as a long streak on the left. I scanned with a more limited azimuth to try catching this faster, but I still almost missed it.
I also tried looking at Wifi frequencies (using a Ham-It-Down converter to get into the 2.4ghz band). However, this didn’t work as well, either due to my feed or my code.
I have a few more issues to work out, such as the choppy image that seems to alternate clockwise and counterclocksise motions with different signal strengths. This could be due to a number of things, and I never quite figured it out. I’d also like to try other frequency ranges, like more S-band, Wifi, and fainter L-band signals like GOES. Those improvements will probably have to wait for next year!
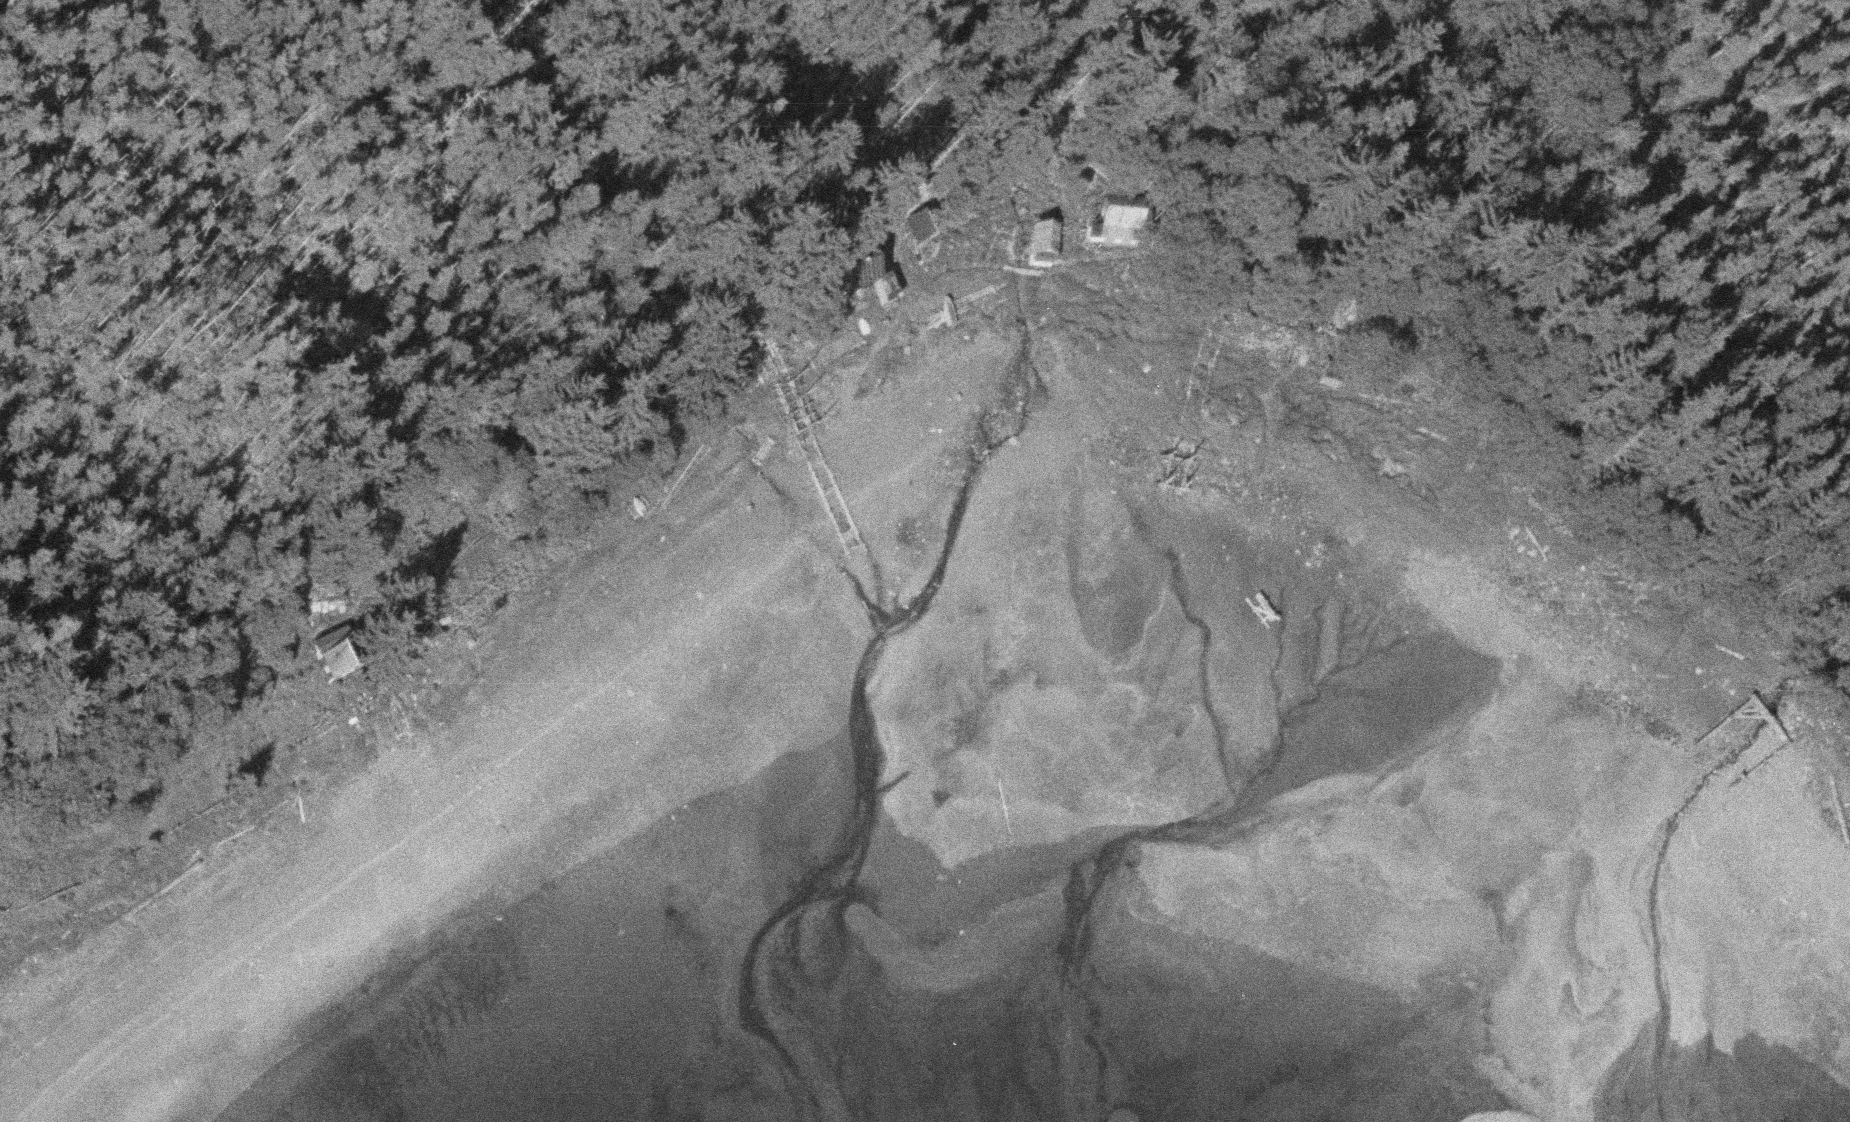
Recently I was browsing through the USGS Earth Explorer website, looking for historic aerials for another project I’m working on. I came across a set of 1965 aerial photos of Funter Bay that I don’t think I’ve seen before.
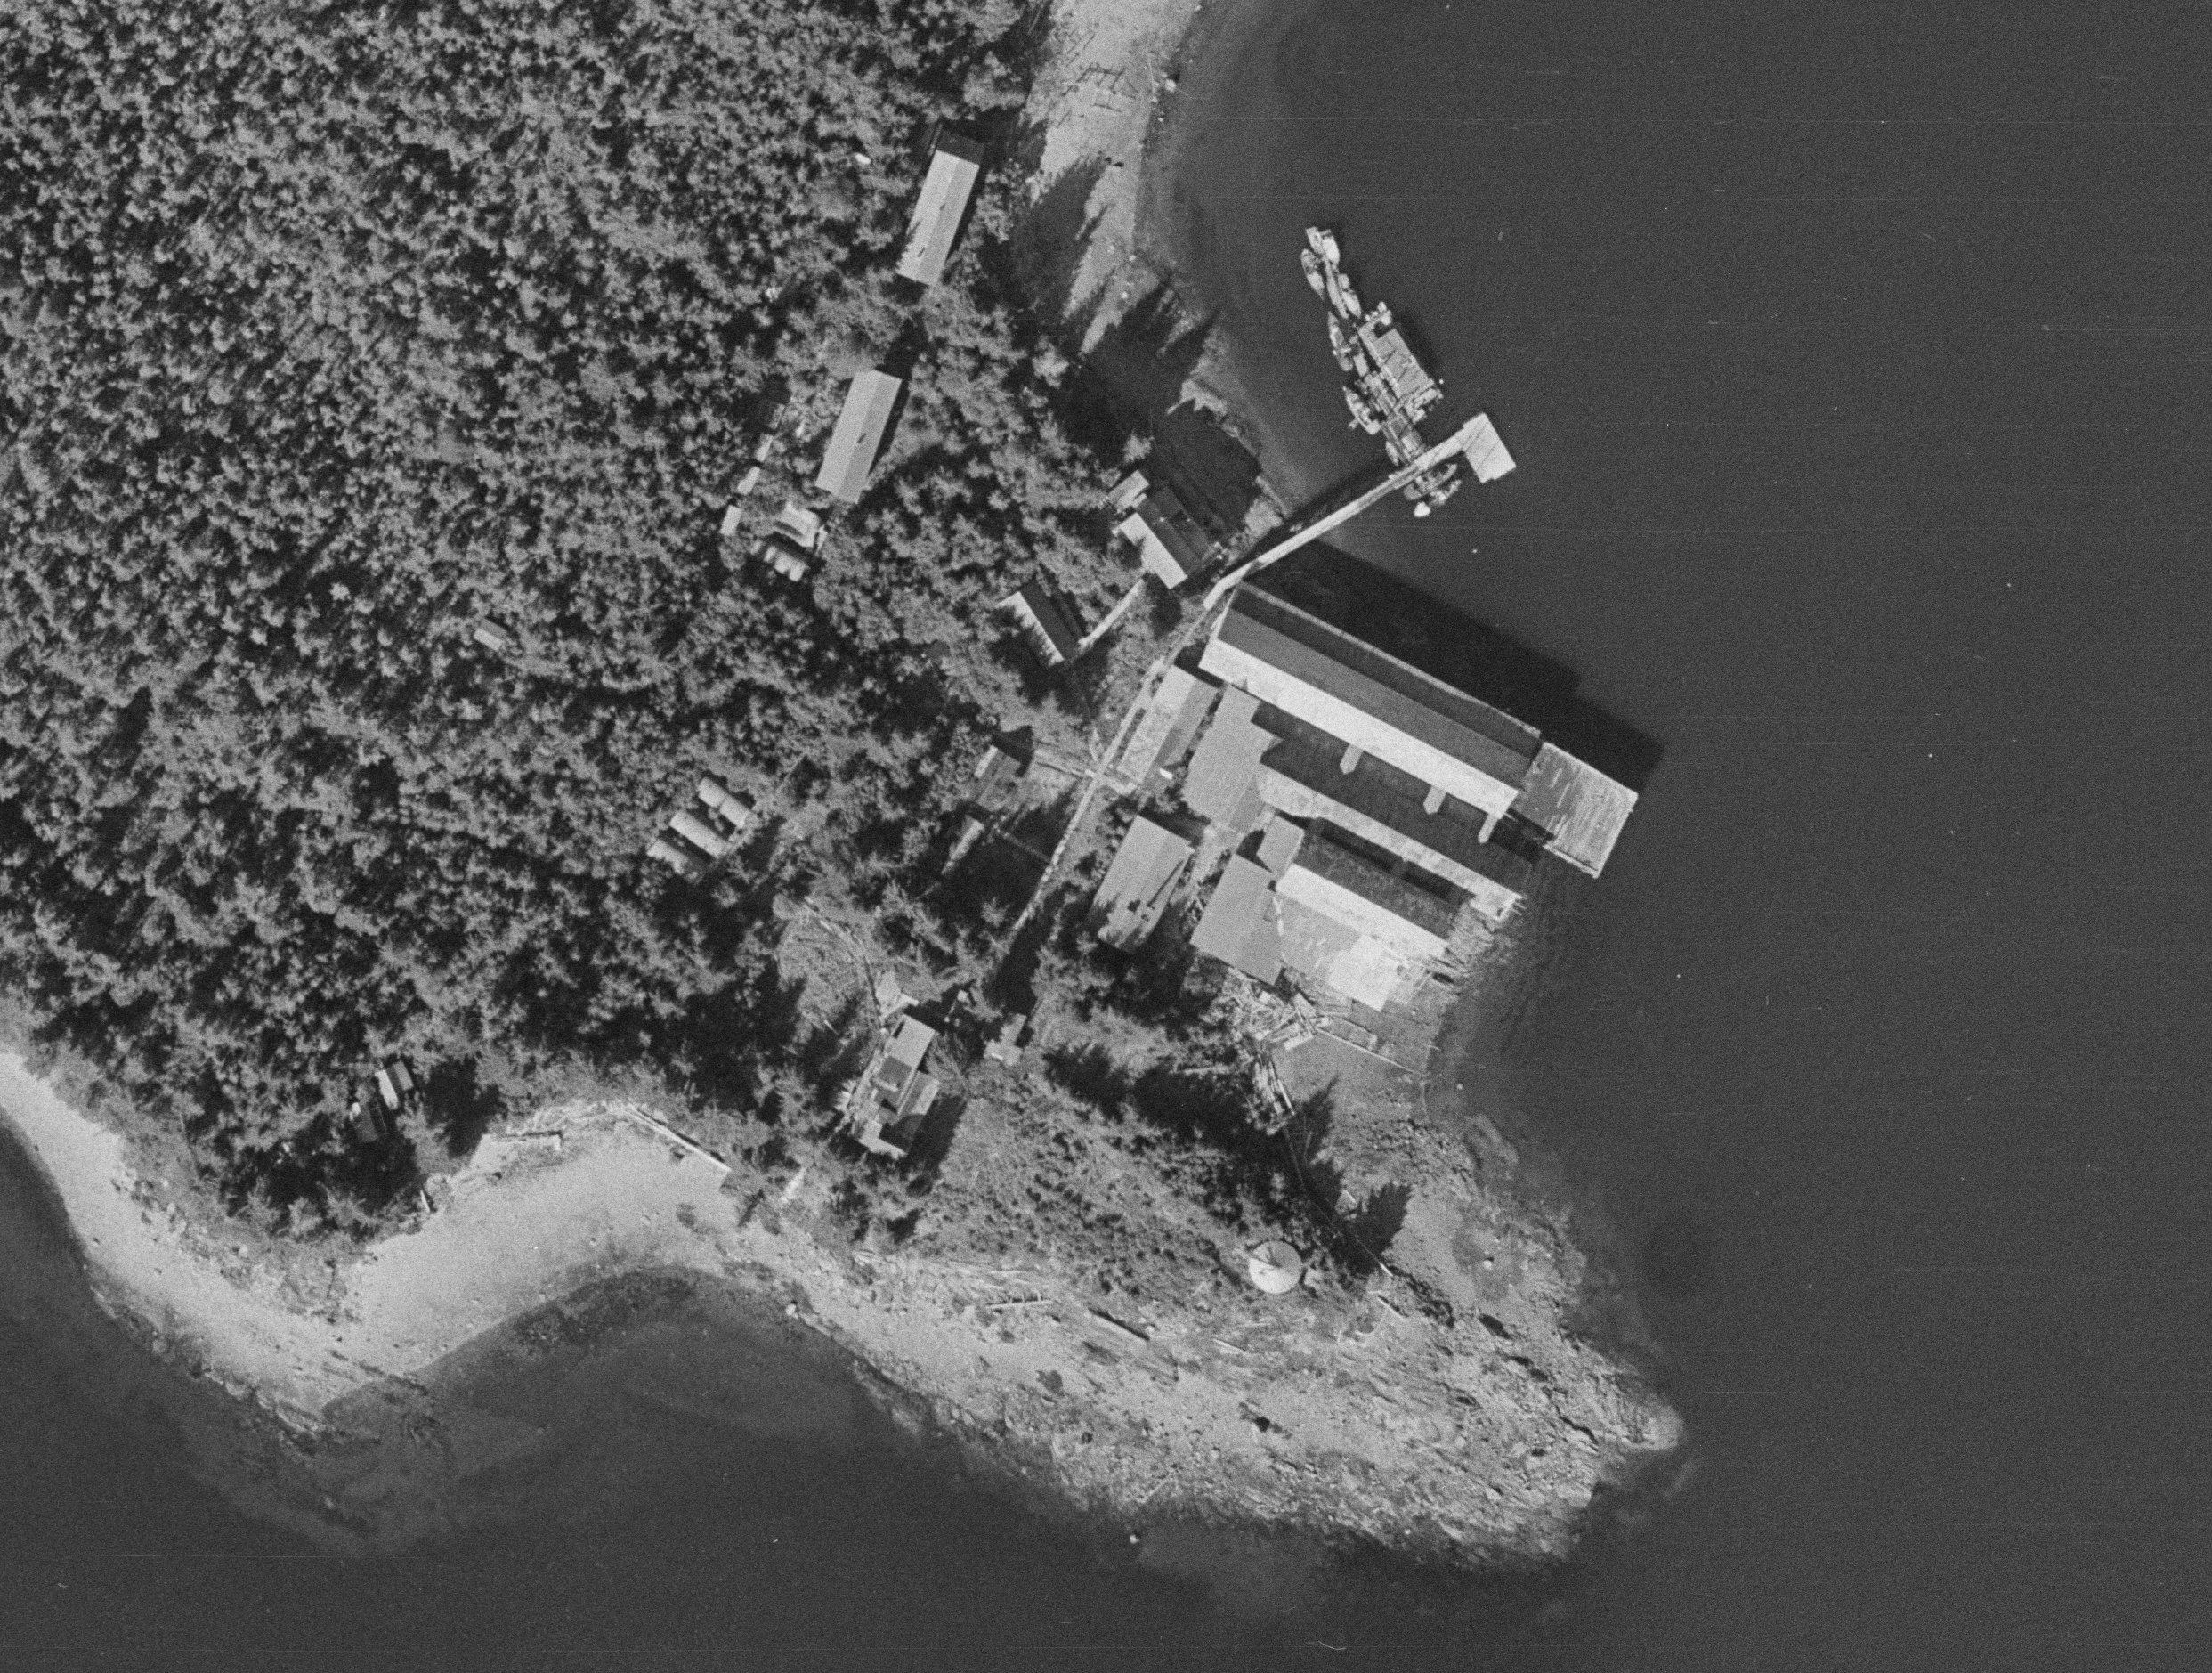
The photos run in a series of 4, going approximately North to South over the West side of the bay. They clearly show the Thlinket Packing Co cannery (owned by Peter Pan Seafoods at the time).
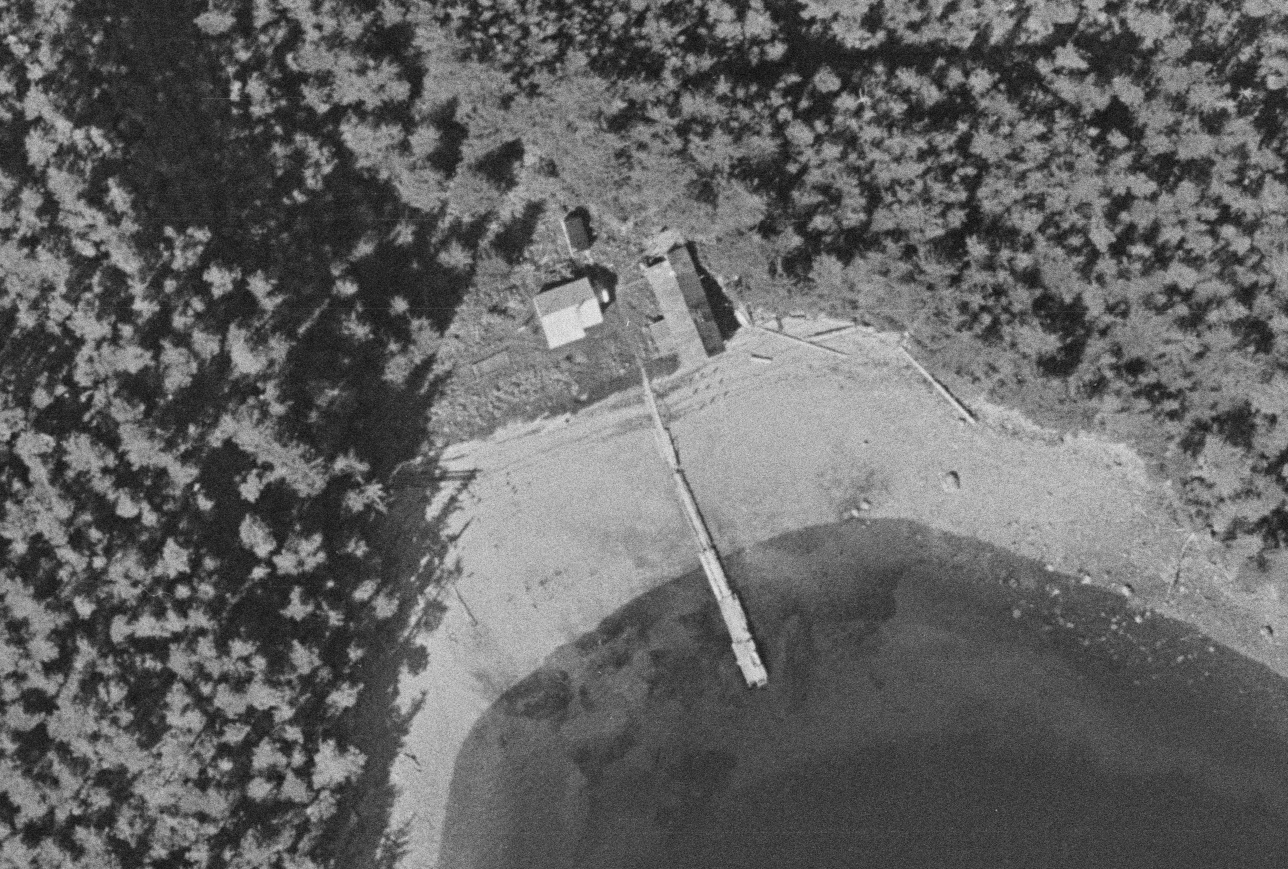
These are pretty high-resolution photos, I’m only able to post snippets here since the full size images are huge! Other areas of detail include several homes and cabins, like Harold and Mary Hargrave’s place:
You can also see the “neighborhood” where I grew up, Crab Cove. This was before most of the modern houses and cabins were built, some of the structures seen here were later torn down or incorporated into larger buildings. My family’s house would be near the top middle, between the creek and the railroad-like marine slipway
These photos were taken on July 8th, 1965, during the fishing season. The time may have been later in the evening, as you can see several salmon trollers anchored or reversing to anchor:
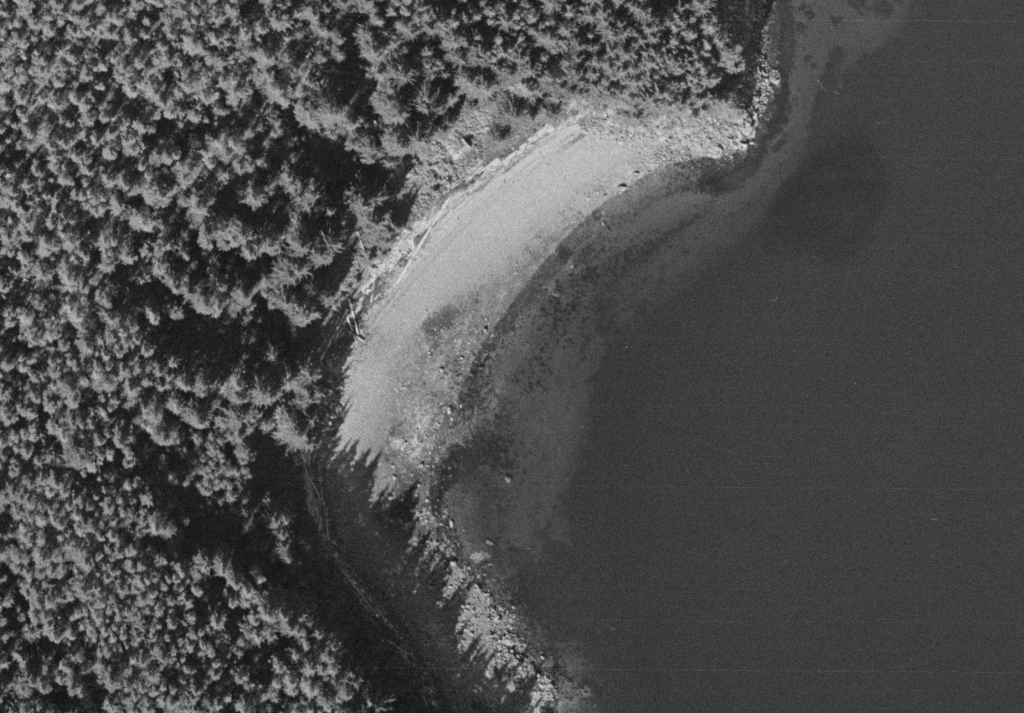
You can also see various ruins and abandoned relics around the bay, such as the old Keeler Cabin (upper middle):
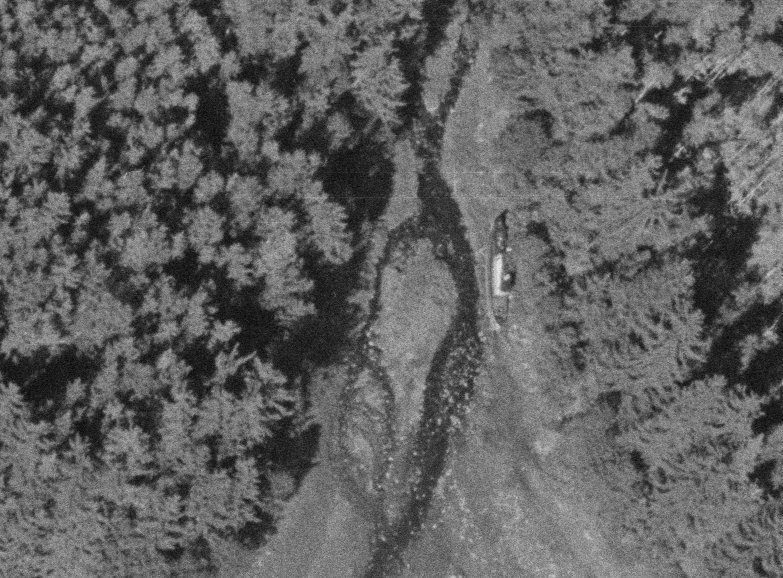
The wreck of the Nimrod:
And another wreck, likely one of the cannery tender vessels, next to some abandoned fish trap frames:
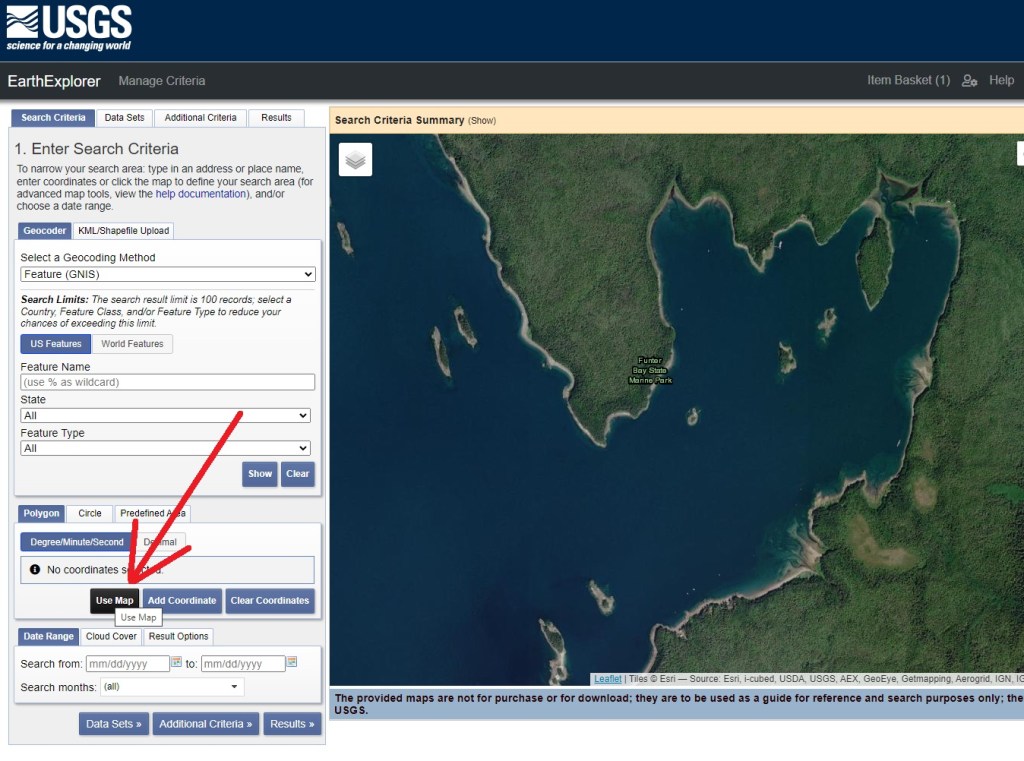
The original images are far too large for my website, at ~250mb each. You can find them on https://earthexplorer.usgs.gov/ with the following steps:
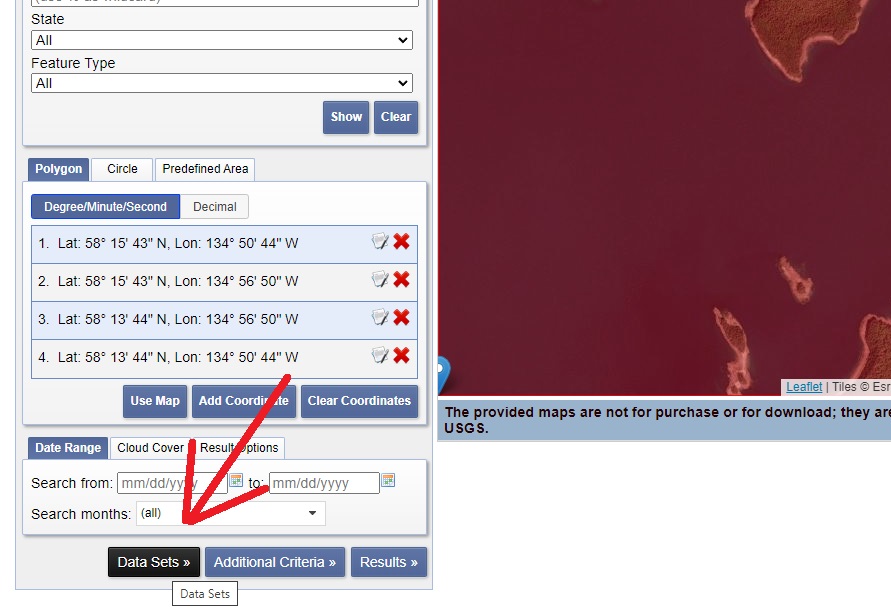
– Scroll to Funter Bay (or other area of interest). Make sure the area you want to search is centered in the website, as seen below, and click “Use Map”:
Next click “Data Sets”:
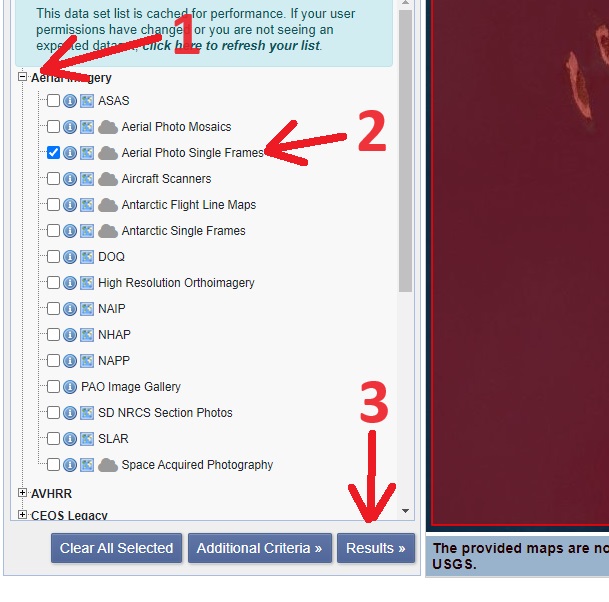
Then expand the “Aerial Imagery” section, select “Aerial Photo Single Frames”, and click “Results”:
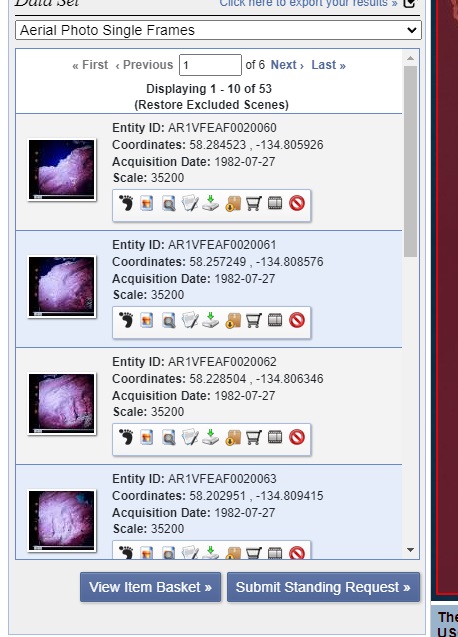
You should now see a bunch of aerial photos of your selected area. For Funter Bay there are at least 6 pages to scroll through, and some of them are mis-matched photos from different areas.
Since it’s a government site it’s not very user-friendly, but it does have a lot of neat content. They are apparently still adding photos and data as archives are scanned, so it’s worth checking back every few years to see if anything is new!
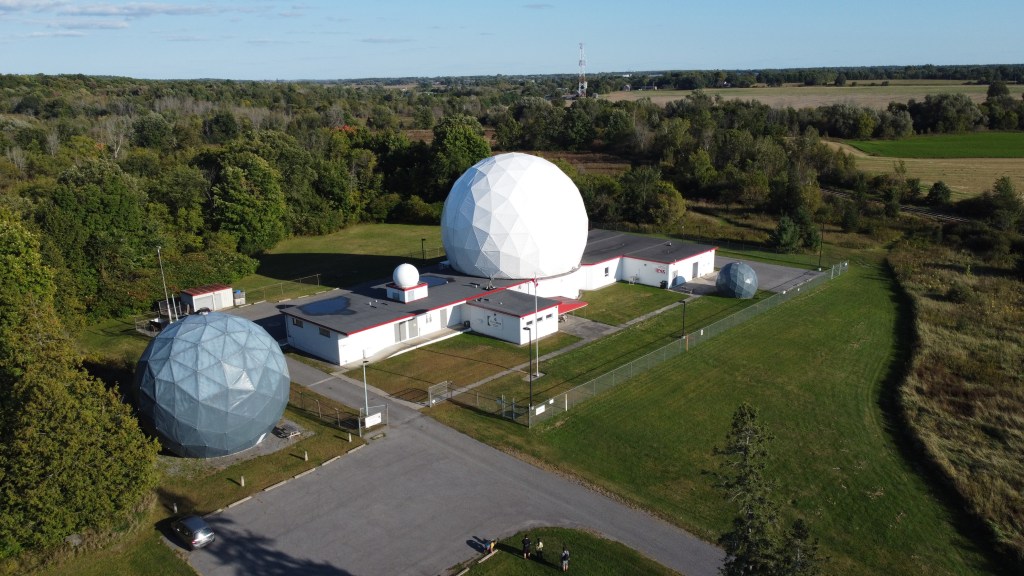
This fall I went up to Ontario, Canada, to pick up an 18ft diameter geodesic dome! (In the picture above, it’s the same size as the one on the far right).
This was at a former NATO satellite facility near the Diefenbunker, outside Ottawa. The big white dome on top of the building is still in use, so we just got a smaller one. You can see the full story below:
We’re planning to install this at Sandland for use as a radio observatory and general cool looking lawn ornament, probably in the upper field near the fast food playland that we picked up previously.
Huge thanks to Marcus Leech and the Canadian Center for Experimental Radio Astronomy (https://www.ccera.ca/) as well as CSS Building Inc (https://www.cssbuilding.ca/) for hooking us up with this! The CCERA is refurbishing the big satellite antenna at Carp into a radio telescope. You can see more about them here:
They’re all volunteers, and as with most science things, they can always use more funding! If you’d like to help CCERA with a donation, click here: https://gofund.me/29c87cc8 Parts of this video were filmed on location at the Diefenbunker: Canada’s Cold War museum. I’ll probably be doing another follow-up video on the bunker since it’s so big and interesting! You can find more about it here: https://diefenbunker.ca/ Thanks also to @SimpleElectronics and Tim Skinner (https://timpossible.photography/) for helping out with this project!
Stay tuned for more videos about this project, coming soon!
The Saveitforparts website has been around since 2001, when I registered the domain in college. Here’s what it looked like 22 years ago (insert joke about my website being old enough to drink):
The frames… the imagemaps… the 30px gifs… they burn!
The Saveitforparts Channel has been sort of a real(ish) thing since about 2020. I had some content on there before, but it wasn’t really set up as a regular “thing”. After some of the monorail videos got popular, I started doing project videos on YouTube. They were awkward, clumsy, and apparently popular enough to get me 1,000 subscribers pretty quickly.
The channel kind of poked along, getting not-that-many views on average. Occasionally there’d be a spike in viewership as the mysterious YouTube algorithm picked something up and promoted it.
Fast-forward to this spring, and the ever-mysterious algorithm decided to push some of my videos to the front page. Boom, suddenly I had 100k subscribers. I’m still not sure how it happened, and the traffic count died off just as fast as it usually does from one of these spikes. For those who think you rake in the cash at 100k… nope! I think you have to be up in the million subscriber range to quit your real job. What you DO get is every seller on Amazon asking you to review their products. Free samples are fun, but I don’t want to become just a review channel!
Anyway, YouTube sends you a wall plaque when you hit certain milestones, and the meme-y thing to do is mistreat them in some way. I took it easy on mine since I actually want it hanging on the wall! Instead of strapping it to a rocket or a submarine, I strapped it to a satellite dish! I was surprised to find that it had good SWR at the frequency range used by military SATCOM systems. Since these are mostly taken over by Brazilian truck drivers, it meant I could listen to CB traffic in Portuguese. Since I don’t speak Portuguese, this is just as entertaining and useless as it sounds.
Anyway, that’s all I have on this Youtube Thing at the moment. I’ll keep cross-spamming my interesting videos over here, and as always you can find them all here.


 Posted by saveitforparts